Python arrays are homogenous data structures. They are used to store multiple items but allow only the same type of data. They are available in Python by importing the array module.
Python Arrays – A Beginner Guide
List, a built-in type in Python, is also capable of storing multiple values. However, they are different from arrays because they are not bound to any specific type.
So, to summarize, arrays are not fundamental types, but lists are internal to Python. An array accepts values of one kind while lists are independent of the data type. To know more about lists, check out our tutorial on Python List.
However, in this tutorial, you’ll get to know how to create an array, add/update, index, remove, and slice.
What is an Array in Python?
An array is a container used to contain a fixed number of items. But, there is an exception that values should be of the same type. The following are two terms often used with arrays.
- Array element – Every value in an array represents an element.
- Array index – Every element has some position in the array known as the index.
Let’s now see how Python represents an array.
Array Illustration
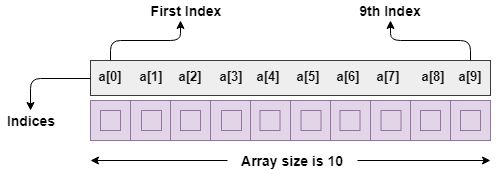
The array is made up of multiple parts. And each section of the array is an element. We can access all the values by specifying the corresponding integer index.
The first element starts at index 0 and so on. At the 9th index, the 10th item would appear. Check the below graphical illustration.

Declare Array in Python
You have first to import the array module in your Python script. After that, declare the array variable as per the below syntax.
Syntax
# How to declare an array variable in Python
from array import *
array_var = array(TypeCode, [Initializers]
In the above statements, “array_var” is the name of the array variable. And we’ve used the array() function which takes two parameters. “TypeCode” is the type of array whereas “Initializers” are the values to set in the array.
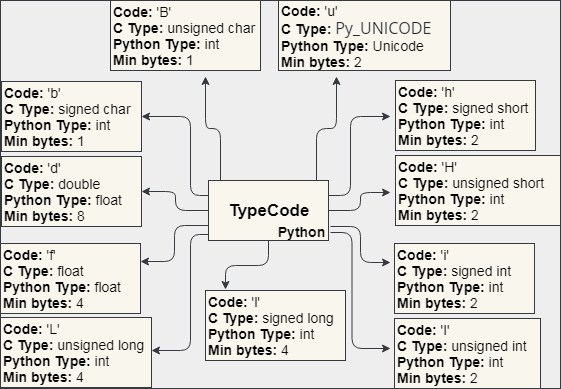
The argument “TypeCode” can be any value from the below chart.

In the above diagram, we’ve listed down all possible type codes for Python and C Types. But we’ll only be using the Python Types “i” for integers and “d” for floats here in our examples.
Also, note that there is one Unicode type shown in the chart. Its support ended with Python version 3.3. So, it is best not to use it in your programs.
Example
Let’s consider a simple case to create an array of 10 integers.
import array as ar

# Create an array of 10 integers using range()
array_var = ar.array('i', range(10))
print("Type of array_var is:", type(array_var))

# Print the values generated by range() function
print("The array will include: ", list(range(10)))
We first imported the array module and then used the Python range() function to produce ten integers. We’ve also printed the numbers that our array variable would hold. Here is the outcome of the above program.
Type of array_var is: <class 'array.array'>
The array will include: [0, 1, 2, 3, 4, 5, 6, 7, 8, 9]
In the next sections, we’ll cover all actions that can be performed using arrays.
Array Operations
Indexing an array
We can use indices to retrieve elements of an array. See the below example:
import array as ar

# Create an array of 10 integers using range()
array_var = ar.array('i', range(10))

# Print array values using indices
print("1st array element is {} at index 0.".format(array_var[0]))
print("2nd array element is {} at index 1.".format(array_var[1]))
print("Last array element is {} at index 9.".format(array_var[9]))
print("Second array element from the tail end is {}.".format(array_var[-2]))
Arrays have their first element stored at the zeroth index. Also, you can see that if we use the -ve index, then it gives us elements from the tail end.
The output is:
1st array element is 0 at index 0.
2nd array element is 1 at index 1.
Last array element is 9 at index 9.
Second array element from the tail end is 8.
Slicing arrays
The slice operator “:” is commonly used to slice strings and lists. However, it does work for the arrays also. Let’s see with the help of examples.
from array import *

# Create an array from a list of integers
intger_list = [10, 14, 8, 34, 23, 67, 47, 22]
intger_array = array('i', intger_list)

# Slice the given array in different situations
print("Slice array from 2nd to 6th index: {}".format(intger_array[2:6]))
print("Slice last 3 elements of array: {}".format(intger_array[:-3]))
print("Slice first 3 elements from array: {}".format(intger_array[3:]))
print("Slice a copy of entire array: {}".format(intger_array[:]))
When you execute the above script, it produces the following output:
Slice array from 2nd to 6th index: array('i', [8, 34, 23, 67])
Slice last 3 elements of array: array('i', [10, 14, 8, 34, 23])
Slice first 3 elements from array: array('i', [34, 23, 67, 47, 22])
Slice a copy of entire array: array('i', [10, 14, 8, 34, 23, 67, 47, 22])
The following two points, you should note down:
- When you pass both the left and right operands to the slice operator, then they act as the indexes.
- If you take one of them whether the left or right one, then it represents the no. of elements.
Add/Update arrays in Python
We can make changes to an array in different ways. Some of these are as follows:
- Assignment operator to change or update an array
- Append() method to add one element
- Extend() method to add multiple items
We’ll now understand each of these approaches with the help of examples.
Let’s begin by using the assignment operator to update an existing array variable.
from array import *

# Create an array from a list of integers
num_array = array('i', range(1, 10))
print("num_array before update: {}".format(num_array))

# Update the elements at zeroth index
index = 0
num_array[index] = -1
print("num_array after update 1: {}".format(num_array))

# Update the range of elements, say from 2-7
num_array[2:7] = array('i', range(22, 27))
print("num_array after update 2: {}".format(num_array))
The output is:
num_array before update: array('i', [1, 2, 3, 4, 5, 6, 7, 8, 9])
num_array after update 1: array('i', [-1, 2, 3, 4, 5, 6, 7, 8, 9])
num_array after update 2: array('i', [-1, 2, 22, 23, 24, 25, 26, 8, 9])
Now, we’ll apply the append() and extend() methods on a given array. These work the same for lists in Python. See the tutorial below.
Must Read- Difference Between List Append() and Extend()
from array import *

# Create an array from a list of integers
num_array = array('i', range(1, 10))
print("num_array before append()/extend(): {}".format(num_array))

# Add one elements using the append() method
num_array.append(99)
print("num_array after applying append(): {}".format(num_array))

# Add multiple elements using extend() methods
num_array.extend(range(20, 25))
print("num_array after applying extend(): {}".format(num_array))
This program yields the following:
num_array before append()/extend(): array('i', [1, 2, 3, 4, 5, 6, 7, 8, 9])
num_array after applying append(): array('i', [1, 2, 3, 4, 5, 6, 7, 8, 9, 99])
num_array after applying extend(): array('i', [1, 2, 3, 4, 5, 6, 7, 8, 9, 99, 20, 21, 22, 23, 24])
The point to note is that both append() and extend() add elements to the end. The next tip is an interesting one. We can join two or more arrays using the “+” operator. If interested, learn about the different operators available in Python.
from array import *

# Declare two arrays using Python range()
# One contains -ve integers and 2nd +ve values.
num_array1 = array('i', range(-5, 0))
num_array2 = array('i', range(0, 5))

# Printing arrays before joining
print("num_array1 before joining: {}".format(num_array1))
print("num_array2 before joining: {}".format(num_array2))

# Now, concatenate the two arrays
num_array = num_array1 + num_array2

print("num_array after joining num_array1 and num_array2: {}".format(num_array))
The above script shows the following result after execution:
num_array1 before joining: array('i', [-5, -4, -3, -2, -1])
num_array2 before joining: array('i', [0, 1, 2, 3, 4])
num_array after joining num_array1 and num_array2: array('i', [-5, -4, -3, -2, -1, 0, 1, 2, 3, 4])
Remove array elements
There are multiple ways that we can follow to remove elements from an array. Here are these:
- Python del operator
- Remove() method
- Pop() method
Let’s first check how Python del works to delete array members.
from array import *

# Declare an array of 10 floats
num_array = array('f', range(0, 10))

# Printing the array before deletion of elements
print("num_array before deletion: {}".format(num_array))

# Delete the first element of array
del num_array[0]
print("num_array after removing first element: {}".format(num_array))

# Delete the last element
del num_array[len(num_array)-1]
print("num_array after removing the last element: {}".format(num_array))

# Remove the entire array in one go
del num_array

# Printing a deleted array would raise the NameError
print("num_array after removing first element: {}".format(num_array))
The output is as follows:
num_array before deletion: array('f', [0.0, 1.0, 2.0, 3.0, 4.0, 5.0, 6.0, 7.0, 8.0, 9.0])
num_array after removing first element: array('f', [1.0, 2.0, 3.0, 4.0, 5.0, 6.0, 7.0, 8.0, 9.0])
num_array after removing the last element: array('f', [1.0, 2.0, 3.0, 4.0, 5.0, 6.0, 7.0, 8.0])
print("num_array after removing first element: {}".format(num_array))
-->NameError: name 'num_array' is not defined
Now, let’s try to utilize the remove() and pop() methods. The former removes the given value from the array whereas the latter deletes the item at a specified index.
from array import *

# Declare an array of 8 numbers
num_array = array('i', range(11, 19))

# Printing the array before deletion of elements
print("num_array before deletion: {}".format(num_array))

# Remove 11 from the array
num_array.remove(11)
print("Array.remove() to remove 11: {}".format(num_array))

# Delete the last element
num_array.pop(len(num_array)-1)
print("Array.pop() to remove last element: {}".format(num_array))
After running this code, we get the below result:
num_array before deletion: array('i', [11, 12, 13, 14, 15, 16, 17, 18])
Array.remove() to remove 11: array('i', [12, 13, 14, 15, 16, 17, 18])
Array.pop() to remove last element: array('i', [12, 13, 14, 15, 16, 17])
Reverse arrays in Python
Last but not least is how we can reverse the elements of an array in Python. There can be many approaches to this. However, we’ll take the following two:
Check out the below sample code to invert the element in a given array.
from array import *

# Declare an array of 8 numbers
num_array = array('i', range(11, 19))

# Printing the original array
print("num_array before the reverse: {}".format(num_array))

# Reverse the array using Python's slice operator
print("Reverse num_array using slice operator: {}".format(num_array[::-1]))

# Reverse the array using List comprehension
print("Reverse num_array using List comprehension: {}".format(array('i', [num_array[n] for n in range(len(num_array) - 1, -1, -1)])))
The above code produces the following output after running:
num_array before the reverse: array('i', [11, 12, 13, 14, 15, 16, 17, 18])
Reverse num_array using slice operator: array('i', [18, 17, 16, 15, 14, 13, 12, 11])
Reverse num_array using List comprehension: array('i', [18, 17, 16, 15, 14, 13, 12, 11])
Now, we are mentioning a bonus method to reverse the array using the reversed() call. This function inverts the elements and returns a “list_reverseiterator” type object. However, if you want more info, read our in-depth tutorial on 7 ways to reverse a list in Python.
"""
 Example:
  Applying Python Reversed() on an array
"""
from array import *

def print_Result(iter, orig):
    print("##########")
    print("Original: ", orig)
    print("Reversed: ", end="")
    for it in iter:
        print(it, end=' ')
    print("\n##########")

def reverse_Array(in_array):
    result = reversed(in_array)
    print_Result(result, in_array)

# Declare an array of 8 numbers
in_array = array('i', range(11, 19))

reverse_Array(in_array)
Here is the output of the above example.
##########
Original: array('i', [11, 12, 13, 14, 15, 16, 17, 18])
Reversed: 18 17 16 15 14 13 12 11
##########
We hope that after wrapping up this tutorial, you will feel comfortable using Python arrays. However, you may practice more with examples to gain confidence.
Lastly, our site needs your support to remain free. Share this post on social media (Linkedin/Twitter) if you gained some knowledge from this tutorial.
Also, to learn Python from scratch to depth, read our step-by-step Python tutorial.


