Unlike the old & reliable JUnit Test Framework, TestNG is the modern-day test automation tool. It has built-in support for data-driven testing and provides two ways to supply data to the test cases, i.e., via TestNG Parameters and DataProvider annotations.
With the addition of these two annotations, the TestNG framework filled a significant gap that its predecessor had. One of these annotations adds the ability to use fixed data values in the test cases whereas the other one allows querying values from any external data sources like Excel or the properties files.
Must Read: How to Use DataProvider in TestNG
Learn – TestNG Parameters and DataProvider Annotations
In the next sections, you’ll see the live usage of both the TestNG Parameters and DataProvider annotations with ready-to-run examples.

Parametric Testing Benefits
Before we proceed, let’s understand the benefit of data-driven/parametric testing. Any test automation tool that has both of these capabilities can efficiently take care of the following cases.
- Process the large data set as per business requirements.
- Run the same test over and over again with different values.
Let’s now see when and how can we use the <@Parameters> annotation in TestNG projects.
@Parameters Annotation
With the help of this annotation, you can allow single as well as multiple parameter values to the test methods.
We can use it for parameter testing. It is advisable when the data is small and fixed for the test cases.
Example – @Parameters Annotation
Follow the below steps to make use of the <@Parameters> annotation.
Step-1
Create a new Java class and name it as <ParametersTesting.Java>. Add the following two methods to the class.
i- OpenBrowser()
- It’ll take a single String type parameter, i.e., browserName.
- Add the annotation @Parameters(“BrowserName”) to this method.
ii- FillLoginForm()
- It’ll take two String type parameters, i.e., UserName and Passcode.
- Add the annotation @Parameters({ “UserName”, “Passcode” }) to this method.
package com.techbeamers.testng;

import org.testng.annotations.Parameters;
import org.testng.annotations.Test;

public class ParametersTesting {

	@Parameters({ "BrowserName" })
	@Test
	public void OpenBrowser(String BrowserName) {
		System.out.println("browser passed as :- " + BrowserName);
	}

	@Parameters({ "UserName", "Passcode" })
	@Test
	public void FillLoginForm(String UserName, String Passcode) {
		System.out.println("Parameter for User Name passed as :- " + UserName);
		System.out.println("Parameter for Passcode passed as :- " + Passcode);
	}
}
Step-2
In Eclipse, select the <ParametersTesting.Java> file. Right-click and press the “TestNG >> Convert to TestNG” option to generate the <TestNG.XML> file.
Below is the TestNG.XML file with parameters associated with the test methods.
<!DOCTYPE suite SYSTEM "http://testng.org/testng-1.0.dtd">
<suite name="Parameters Testing Test Suite">
	<test name="Parameters Testing">
		<parameter name="BrowserName" value="Firefox"/>
		<parameter name="UserName" value="demo"/>
		<parameter name="Passcode" value="PASSWORD"/>
		<classes>
			<class name="com.techbeamers.testng.ParametersTesting" />
		</classes>
	</test>
</suite>
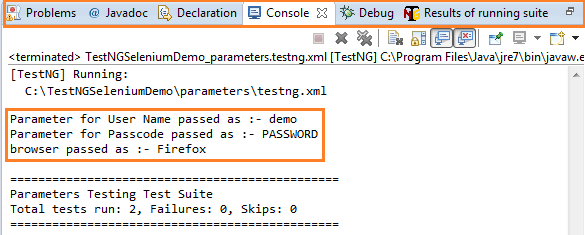
It’s now time to execute the <TestNG.XML> file. Right-click the XML file from the Eclipse IDE, and press the “Run As >> TestNG Suite” option. After the execution, the output will be displayed like the one given in the below screenshot.
Another interesting fact about TestNG is that it allows passing optional parameters using the @Optional annotation.
@Optional Annotation
You can use it to specify an optional value for a parameter that is not available in the TestNG.XML file.
Example – @Optional Annotation
Refer to the below @Optional annotation example.
package com.techbeamers.testng;

import org.testng.annotations.Optional;
import org.testng.annotations.Parameters;
import org.testng.annotations.Test;

public class OptionalTesting
{
    @Parameters({ "optional-value" })
    @Test
    public void optionCheck(@Optional("Optional Value") String value) {
        System.out.println("This is: " + value);
    }
}
TestNG XML
Here is the “TestNG.XML” associated with the above example.
<?xml version="1.0" encoding="UTF-8"?>
<!DOCTYPE suite SYSTEM "http://testng.org/testng-1.0.dtd">
<suite name="Optional Testing Test Suite" verbose="1">
  <test name="Optional Testing Part1">
    <classes>
      <class name="com.techbeamers.testng.OptionalTesting" />
    </classes>
  </test>
  <test name="Optional Testing Part2">
    <parameter name="optional-value" value="Provided from XML" />
    <classes>
      <class name="com.techbeamers.testng.OptionalTesting" />
    </classes>
  </test>
</suite>
You can check from the above <testng.xml> file that it has two test methods defined in it. The first test doesn’t have any parameter while the second one specifies a parameter named "optional-value."
Output:
After running the <testng.xml> as a test suite, the output would be as follows.
[TestNG] Running:
  C:\TestNGSeleniumDemo\optional\testng.xml

This is: Optional Value
This is: Provided from XML

===============================================
Optional Testing Test Suite
Total tests run: 2, Failures: 0, Skips: 0
===============================================
If you observe the test results, TestNG has used the optional value while executing the first test method. It happened because TestNG couldn’t find a parameter named “optional-value” in the XML file for the first test. However, for the second test, it resolved the parameter value which also gets printed during the test execution.
For your note, you can use the parameter annotation with any of the Before/After, Factory, and Test annotated methods. Additionally, you can utilize it to set variables and use them in class, test, or test suites.
@DataProvider Annotation
The data provider is another annotation that supports data-driven testing. You can use it to handle a broad range of complex parameters like the following.
- Java objects
- Objects from a database
- Data from Excel or property files
Facts on @DataProvider Annotation
Below are some interesting facts about the data provider.
- This annotation has one string attribute which is its name. If you don’t specify a name, then the method’s name serves as the default name.
- A data provider method prepares and returns a 2-D list of objects.
- A data-driven test would run once for each set of data specified by the data provider object.
How to Use @DataProvider Annotation
Now let’s view the steps required to use the data provider annotation for data-driven testing.
- Create a new Java class, say, the DataProviderTest.Java.
- Define the data provider method annotated using the <@DataProvider>. It should return the 2-D list of objects.
- Add a test method and decorate it using the <@Test(dataProvider = “name of data provider”)>.
For more clarity on the data provider annotation, read the below code example very carefully. In this code example, we are demonstrating the three different usages of data providers.
- Passing Java integer object using the data provider
- Streaming Java bean object using the data provider
Example Using @DataProvider Annotation
package com.techbeamers.testng;

import org.testng.Assert;
import org.testng.annotations.BeforeMethod;
import org.testng.annotations.DataProvider;
import org.testng.annotations.Test;

public class DataProviderTest {

	// =================================================================
	// Odd Digit Test
	public class OddDigit {
		public Boolean validate(int num) {

			return (num % 2 == 0 ? false : true);
		}
	}

	private OddDigit oddDigit;

	@BeforeMethod
	public void initialize() {
		oddDigit = new OddDigit();
	}

	@DataProvider(name = "OddDigitTest")
	public static Object[][] getNumbers() {
		return new Object[][] { { 1, true }, { 7, true }, { 10, false },
				{ 12, false }, { 15, true } };
	}

	// This test will run 5 times as we are passing 5 parameters.
	@Test(dataProvider = "OddDigitTest")
	public void testPrimeNumberChecker(Integer inputNumber,
			Boolean expectedResult) {
		System.out.println(inputNumber + " " + expectedResult);
		Assert.assertEquals(expectedResult, oddDigit.validate(inputNumber));
	}

	// =================================================================
	// Java Bean Object Test
	public static class JBean {
		private String type;

		public JBean(String type) {
			this.type = type;
		}

		public String getVal() {
			return type;
		}

		public void setVal(String type) {
			this.type = type;
		}
	}

	@DataProvider(name = "JavaBeanObjectTest")
	public static Object[][] getJBeans() {
		return new Object[][] { { new JBean("Stateless Session Beans") },
				{ new JBean("Stateful Session Beans") } };
	}

	@Test(dataProvider = "JavaBeanObjectTest")
	public void testMethod(JBean myBean) {
		System.out.println(myBean.getVal());
	}
}
TestNG XML File
You can run the above code from Eclipse as a TestNG Test. Or you can generate the <TestNG.XML> and then run the XML file as a TestNG Suite.
<?xml version="1.0" encoding="UTF-8"?>
<!DOCTYPE suite SYSTEM "http://testng.org/testng-1.0.dtd">
<suite name="DataProviderSuite" parallel="tests">
  <test name="DataProviderTest">
    <classes>
      <class name="com.techbeamers.testng.DataProviderTest"/>
    </classes>
  </test> <!-- DataProviderTest -->
</suite> <!-- DataProviderSuite -->
Output:
After you execute the above code either as a test or as a test suite, you’ll see the following output. Please verify the below snippet.
[TestNG] Running:
  C:\TestNGSeleniumDemo\dataprovider\testng.xml

Stateless Session Beans
Stateful Session Beans
1 true
7 true
10 false
12 false
15 true

===============================================
DataProviderSuite
Total tests run: 7, Failures: 0, Skips: 0
===============================================
Related Posts: TestNG Framework
1. Learn to Install TestNG in Eclipse
2. Create a TestNG Test Case in Selenium
Final Word – TestNG Parameters and DataProvider
We’ve tried to cover as much as we could about the TestNG Parameters and DataProvider annotations along with their examples.
However, there are many other data provider use cases that we will address in a separate post. Till then enjoy reading this post and share it on social media.
All the Best,
TechBeamers


