In this post, we’ll explain and demonstrate a method for saving Selenium WebDriver TestNG results in an Excel file. So, first of all, we’ll create a basic Java project in Eclipse and add the Selenium WebDriver TestNG packages. Also, we’ll show how to use multiple TestNG @Test methods for executing the different testing tasks.
You’ll see how easy it is to generate the TestNG XML using Eclipse and then use it for grouping the multiple tests into a single TestNG suite. More importantly, we’ll list the steps to save Selenium WebDriver TestNG results to an Excel file. Interestingly, you would be curious to know how we used the @BeforeClass and @AfterClass TestNG annotations for the test setup and test cleanup.
But before we proceed further, see if you want to see the step-by-step details of installing TestNG in Eclipse. Also, we’ve split this post into multiple sections because it is easy to grasp a smaller set of instructions.
Update Your Selenium Test Results in Excel Using TestNG

1- Create a Selenium Webdriver TestNG project in Eclipse
Start by launching the Eclipse IDE and create a new Java project. Then, name the test project as TestNGSeleniumDemo, you can change the name if you wish. Also, add a new package to the project and save it as com.techbeamers.testng.
Next, you’ll be adding the latest Selenium Webdriver standalone jar to your project. You can download it from the Seleniumhq.org website.
Also, we’ve to save the test results into an Excel file which we can do by using the Apache POI library. So, download it as well from the https://poi.apache.org/download.html website.
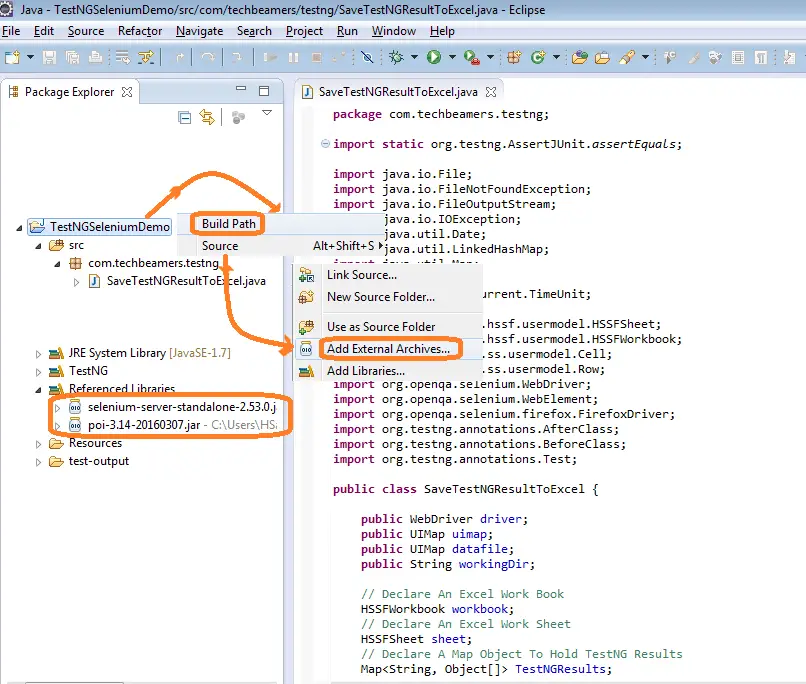
Consequently, please check that you add both of these .jar files as external jars into the TestNGSeleniumDemo project. Here is a quick snapshot to help you in doing this.

Furthermore, there are three main things you have to do, which are as follows.
a) First of all, create a Resources folder under your TestNGSeleniumDemo project.
b) Then, add a new file and name it as datafile.properties.
Just create a file with the specified name and copy/paste the below lines.
url=http://phptravels.net/login
username=user@phptravels.com
password=demouser
c) Add the locator(dot)properties file. Do the same steps as mentioned in the previous point.
Username_field =name:username
Password_field =name:password
Login_button =classname:loginbtn
online_user =classname:RTL
2- Define multiple @Test methods
As we’ve explained above, we need three test methods to run the following tasks.
- Opens the TestNG Demo Website for Login Test
- Fill in the Login Details.
- Perform Login.
Here is the source code for the above three functions.
@Test(description = "Opens the TestNG Demo Website for Login Test")
public void LaunchWebsite() throws Exception {

  try {
    driver.get("http://phptravels.net/login");
    driver.manage().window().maximize();
    driver.manage().timeouts().implicitlyWait(50, TimeUnit.SECONDS);
    TestNGResults.put("2", new Object[] {
      1 d,
      "Navigate to demo website", "Site gets opened", "Pass"
    });
  } catch (Exception e) {
    TestNGResults.put("2", new Object[] {
      1 d,
      "Navigate to demo website", "Site gets opened", "Fail"
    });
  }
}

@Test(description = "Fill the Login Details")
public void FillLoginDetails() throws Exception {

  try {
    // Get the username element
    WebElement username = driver.findElement(uimap
      .getLocator("Username_field"));
    username.sendKeys(datafile.getData("username"));

    // Get the password element
    WebElement password = driver.findElement(uimap
      .getLocator("Password_field"));
    password.sendKeys(datafile.getData("password"));

    TestNGResults.put("3", new Object[] {
      2 d,
      "Fill Login form data (Username/Password)",
      "Login details gets filled", "Pass"
    });

  } catch (Exception e) {
    TestNGResults.put("3", new Object[] {
      2 d,
      "Fill Login form data (Username/Password)",
      "Login form gets filled", "Fail"
    });
  }
}

@Test(description = "Perform Login")
public void DoLogin() throws Exception {

  try {
    // Click on the Login button
    WebElement login = driver.findElement(uimap
      .getLocator("Login_button"));
    login.click();

    Thread.sleep(3000);
    // Assert the user login by checking the Online user
    WebElement onlineuser = driver.findElement(uimap
      .getLocator("online_user"));
    AssertJUnit.assertEquals("Hi, John Smith", onlineuser.getText());
    TestNGResults.put("4", new Object[] {
      3 d,
      "Click Login and verify welcome message", "Login success",
      "Pass"
    });
  } catch (Exception e) {
    TestNGResults.put("4", new Object[] {
      3 d,
      "Click Login and verify welcome message", "Login success",
      "Fail"
    });
  }
}
3- Write a function to save the Selenium WebDriver TestNG report to an Excel file
Now, we’ll write a routine to back up the results of each step executed into an Excel file. For this purpose, we’ll use the Apache POI Apis. You should note that we’ve used the @AfterClass annotation for this function. So, it’ll get executed after executing all methods of the TestNG class. Please check out the below source code.
Code Snippet.
@AfterClass
public void suiteTearDown() {
  // write excel file and file name is SaveTestNGResultToExcel.xls
  Set < String > keyset = TestNGResults.keySet();
  int rownum = 0;
  for (String key: keyset) {
    Row row = sheet.createRow(rownum++);
    Object[] objArr = TestNGResults.get(key);
    int cellnum = 0;
    for (Object obj: objArr) {
      Cell cell = row.createCell(cellnum++);
      if (obj instanceof Date)
        cell.setCellValue((Date) obj);
      else if (obj instanceof Boolean)
        cell.setCellValue((Boolean) obj);
      else if (obj instanceof String)
        cell.setCellValue((String) obj);
      else if (obj instanceof Double)
        cell.setCellValue((Double) obj);
    }
  }
  try {
    FileOutputStream out = new FileOutputStream(new File(
      "SaveTestNGResultToExcel.xls"));
    workbook.write(out);
    out.close();
    System.out
      .println("Successfully saved Selenium WebDriver TestNG result to Excel File!!!");

  } catch (FileNotFoundException e) {
    e.printStackTrace();
  } catch (IOException e) {
    e.printStackTrace();
  }
  // close the browser
  driver.close();
  driver.quit();
}
4- Consolidate the full source code
We’ve copied all the code of the three test methods and the function to save results to the Excel file into the SaveTestNGResultToExcel.java file. We’ve attached the full source code required to run this example. You can directly copy it to your project. There shouldn’t be any error if you would have followed all the steps specified above.
Please make sure you add the SaveTestNGResultToExcel.java under the com.techbeamers.testng package.
Add UIMap.Java from another TestNG tutorial of this blog.
However, there is one more class file UIMap.java which we’ve used in this project. This file reads the user/password from the data file(dot)Properties file. Also, it helps in fetching the pre-set locators from the locator(dot)properties file.
You can get the source code of UIMap.java from this link on our blog. Once you copy its code, then add this file under the same com.techbeamers.testng package in the current project.
Code Snippet.
package com.techbeamers.testng;

import java.io.File;
import java.io.FileNotFoundException;
import java.io.FileOutputStream;
import java.io.IOException;
import java.util.Date;
import java.util.LinkedHashMap;
import java.util.Map;
import java.util.Set;
import java.util.concurrent.TimeUnit;

import org.apache.poi.hssf.usermodel.HSSFSheet;
import org.apache.poi.hssf.usermodel.HSSFWorkbook;
import org.apache.poi.ss.usermodel.Cell;
import org.apache.poi.ss.usermodel.Row;
import org.openqa.selenium.WebDriver;
import org.openqa.selenium.WebElement;
import org.openqa.selenium.chrome.ChromeDriver;
import org.testng.Assert;
import org.testng.AssertJUnit;
import org.testng.annotations.AfterClass;
import org.testng.annotations.BeforeClass;
import org.testng.annotations.Test;

public class SaveTestNGResultToExcel {

	public WebDriver driver;
	public UIMap uimap;
	public UIMap datafile;
	public String workingDir;

	// Declare An Excel Work Book
	HSSFWorkbook workbook;
	// Declare An Excel Work Sheet
	HSSFSheet sheet;
	// Declare A Map Object To Hold TestNG Results
	Map<String, Object[]> TestNGResults;
	public static String driverPath = "C:\\workspace\\tools\\selenium\\";

	@Test(description = "Opens the TestNG Demo Website for Login Test", priority = 1)
	public void LaunchWebsite() throws Exception {

		try {
			driver.get("http://phptravels.net/login");
			driver.manage().window().maximize();
			TestNGResults.put("2", new Object[] { 1d, "Navigate to demo website", "Site gets opened", "Pass" });
		} catch (Exception e) {
			TestNGResults.put("2", new Object[] { 1d, "Navigate to demo website", "Site gets opened", "Fail" });
			Assert.assertTrue(false);
		}
	}

	@Test(description = "Fill the Login Details", priority = 2)
	public void FillLoginDetails() throws Exception {

		try {
			// Get the username element
			WebElement username = driver.findElement(uimap.getLocator("Username_field"));
			username.sendKeys(datafile.getData("username"));

			// Get the password element
			WebElement password = driver.findElement(uimap.getLocator("Password_field"));
			password.sendKeys(datafile.getData("password"));

			Thread.sleep(1000);

			TestNGResults.put("3", new Object[] { 2d, "Fill Login form data (Username/Password)",
					"Login details gets filled", "Pass" });

		} catch (Exception e) {
			TestNGResults.put("3",
					new Object[] { 2d, "Fill Login form data (Username/Password)", "Login form gets filled", "Fail" });
			Assert.assertTrue(false);
		}
	}

	@Test(description = "Perform Login", priority = 3)
	public void DoLogin() throws Exception {

		try {
			// Click on the Login button
			WebElement login = driver.findElement(uimap.getLocator("Login_button"));
			login.click();

			Thread.sleep(1000);
			// Assert the user login by checking the Online user
			WebElement onlineuser = driver.findElement(uimap.getLocator("online_user"));
			AssertJUnit.assertEquals("Hi, John Smith", onlineuser.getText());
			TestNGResults.put("4",
					new Object[] { 3d, "Click Login and verify welcome message", "Login success", "Pass" });
		} catch (Exception e) {
			TestNGResults.put("4",
					new Object[] { 3d, "Click Login and verify welcome message", "Login success", "Fail" });
			Assert.assertTrue(false);
		}
	}

	@BeforeClass(alwaysRun = true)
	public void suiteSetUp() {

		// create a new work book
		workbook = new HSSFWorkbook();
		// create a new work sheet
		sheet = workbook.createSheet("TestNG Result Summary");
		TestNGResults = new LinkedHashMap<String, Object[]>();
		// add test result excel file column header
		// write the header in the first row
		TestNGResults.put("1", new Object[] { "Test Step No.", "Action", "Expected Output", "Actual Output" });

		try {

			// Get current working directory and load the data file
			workingDir = System.getProperty("user.dir");
			datafile = new UIMap(workingDir + "\\Resources\\datafile.properties");
			// Get the object map file
			uimap = new UIMap(workingDir + "\\Resources\\locator.properties");

			// Setting up Chrome driver path.
			System.setProperty("webdriver.chrome.driver", driverPath + "chromedriver.exe");
			// Launching Chrome browser.
			driver = new ChromeDriver();
			driver.manage().timeouts().implicitlyWait(5, TimeUnit.SECONDS);
		} catch (Exception e) {
			throw new IllegalStateException("Can't start the Firefox Web Driver", e);
		}

	}

	@AfterClass
	public void suiteTearDown() {
		// write excel file and file name is SaveTestNGResultToExcel.xls
		Set<String> keyset = TestNGResults.keySet();
		int rownum = 0;
		for (String key : keyset) {
			Row row = sheet.createRow(rownum++);
			Object[] objArr = TestNGResults.get(key);
			int cellnum = 0;
			for (Object obj : objArr) {
				Cell cell = row.createCell(cellnum++);
				if (obj instanceof Date)
					cell.setCellValue((Date) obj);
				else if (obj instanceof Boolean)
					cell.setCellValue((Boolean) obj);
				else if (obj instanceof String)
					cell.setCellValue((String) obj);
				else if (obj instanceof Double)
					cell.setCellValue((Double) obj);
			}
		}
		try {
			FileOutputStream out = new FileOutputStream(new File("SaveTestNGResultToExcel.xls"));
			workbook.write(out);
			out.close();
			System.out.println("Successfully saved Selenium WebDriver TestNG result to Excel File!!!");

		} catch (FileNotFoundException e) {
			e.printStackTrace();
		} catch (IOException e) {
			e.printStackTrace();
		}
		// close the browser
		driver.close();
		driver.quit();
	}
}
5- Generate TestNG.XML file
It’s an optional step that you may want to skip. If you ignore it, then Eclipse will auto-generate the TestNG.XML file. But sometimes you need to create it for supplying settings like the test order and parallel execution, etc.
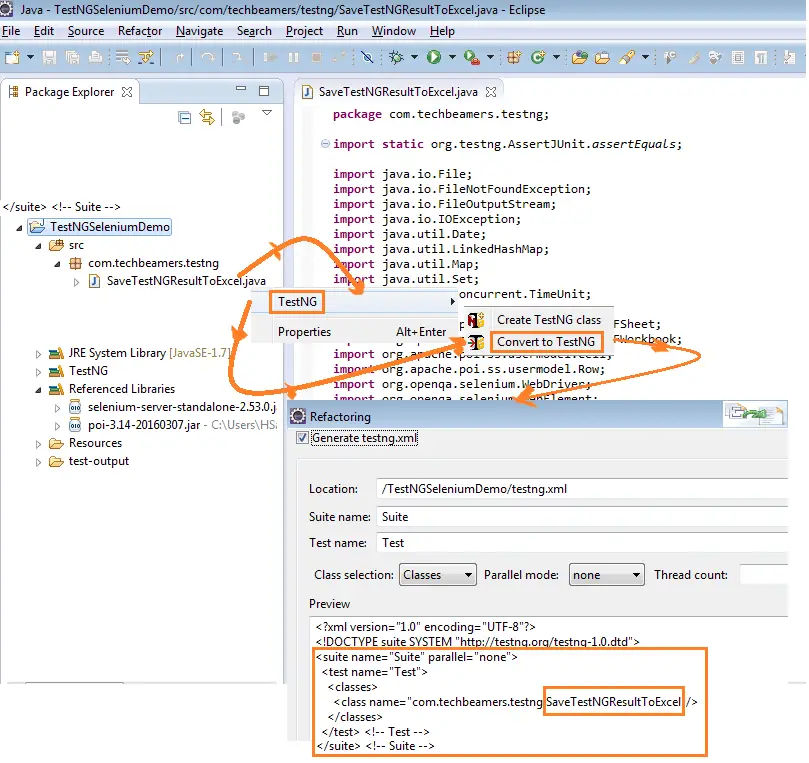
However, you can quickly generate the TestNG.XML file by right-clicking on the SaveTestNGResultToExcel.java file from Project Explorer in Eclipse. See the below screenshot for proper directions to create the file. Also, see sample TestNG.XML file produced after pressing the “TestNG >> Convert to TestNG“ option.

Now, we are attaching the code of the TestNG.XML file created after the above step. You need to add the included directives for specifying the three test methods that we defined in the second section. It will also help in grouping the Methods into the TestNG test suite. From the below XML code, you verify that we’ve created a test suite as SaveTestNGResultToExcel.
><?xml version="1.0" encoding="UTF-8"?>
<!DOCTYPE suite SYSTEM "http://testng.org/testng-1.0.dtd">
<suite name="SaveTestNGResultToExcel" parallel="false">
  <test name="SaveTestNGResultToExcel">
    <classes>
      <class name="com.techbeamers.testng.SaveTestNGResultToExcel">
      	<methods>
      		<include name="LaunchWebsite"></include>
      		<include name="FillLoginDetails"></include>
      		<include name="DoLogin"></include></methods>
      </class>
    </classes>
  </test> <!-- SaveTestNGResultToExcel -->
</suite> <!-- SaveTestNGResultToExcel -->
6- Execute Selenium WebDriver TestNG test suite
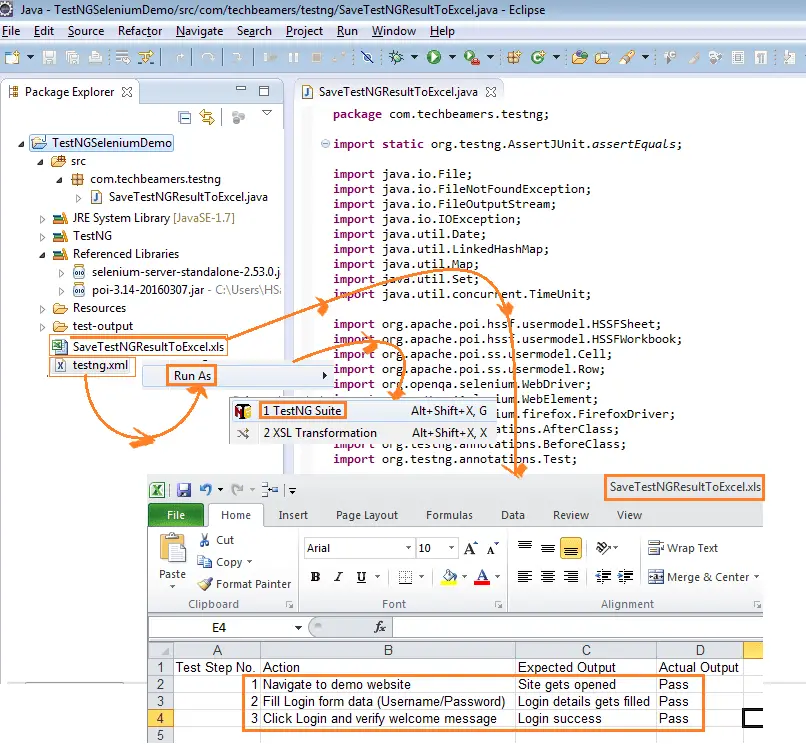
To run the example project or the TestNG test suite, right-click the TestNG.XML file and choose the “Run as >> TestNG“ Suite option. A screenshot is available below for your reference.

After execution, when you refresh the project, you’ll see the SaveTestNGResultToExcel.xls file appearing in the project folder. This file contains all the steps and their pass/fail status. The same is also visible in the above screenshot.
Also Read: Easy steps to setup Selenium Webdriver project in Eclipse
Footnote – Save TestNG Results to Excel
While writing this post, we only thought to come up with something that could add value to the way you currently use the TestNG framework. Hopefully, you now know what to do to save the Selenium WebDriver TestNG result in an Excel file.
Even the interviewers ask these types of questions from the automation testers. So, this post could be quite useful for those who are preparing for job interviews. However, you can use it in your projects, as well.
Finally, if anyone has any suggestions for us, then please use our contact form to share them with us.
All the Best,
TechBeamers


