Maven is a well-known tool for building large Java applications. In this tutorial, we’ll discover what is Maven and what advantages it has over other build tools like ANT. Finally, we’ll expose a detailed process of building the Webdriver project in Maven. And later we’ll walk you through the best approach for running Webdriver tests using Maven in Eclipse IDE. But, you can start with a simple approach to creating a Webdriver project in six steps. Let’s now unearth the Maven concept.
First of all, you must note that building a Test Automation framework using Selenium Webdriver isn’t just about downloading the Selenium API and starting scripting. There is much more to do. You first need an Integrated Development Environment (IDE) to create the test project and other dependencies to build the framework.
And Eclipse is one of the most widely used IDE in the Java world. It provides support for various plug-ins like Maven to ease up the build management tasks for Java projects.
How to Run Webdriver Tests Using Maven in Eclipse
Before we get through the procedure for running Webdriver tests using Maven, let’s begin by understanding the Maven.
What is Maven?
Apache Maven is a very powerful and widely used Java project management and builds management tool. Here is a point-wise summary of its features.
1- It provides support for managing the entire lifecycle of a Java project.
2- Defining the project structure, dependencies, build, and test management is some of its magical traits.
3- Maven as a build tool allows setting up the execution environment for the project code to run independently.
4- It enables a unified platform where you can check out the source code from GIT/SVN, and compile and package it into a JAR/WAR file.
5- You want a project management tool, Maven will do it for you. It has the project object model (POM) file to manage the project’s build, dependency, and documentation.
6- Manage all project-related dependencies using the POM.xml. It helps in setting up all the configurations.
7- Last but not least is its ability to download the project dependency jars automatically from the central repository.
Why use Maven in the Selenium Project?
1- Since Maven is a build automation tool, it can manage the Selenium Webdriver test project’s build compilation and documentation. It eases up the task of creating the right project structure and adding and managing jar files in the project’s build path.
2- Most important feature of Maven is managing the project dependencies using the POM.xml. Let’s take a simple example of upgrading a single jar file. Say, we were using Selenium version 2.53.1 which we later updated to a newer version. Such type of scenario is easy to handle using Maven as it requires updating the version in the POM file.
3- Now imagine the situation, when we have a large number of jar files with updates available. And if we have to update them manually, then it’ll turn out to be a cumbersome task. Also, there is a high probability of errors even if we’ve them updated manually.
4- Maven comes to the rescue in a situation like the above. All we have to do is change the version of the target jar files in the POM file. Maven will download the newer versions of all jar files automatically and store them in a local repository.
How does Maven handle the updates of a dependency?
1- Whenever you update a dependency version in the POM file, Maven first verifies the version of the jar file from the local repository.
2- If the version is available locally, then no action will take place. Else it’ll download the upgrade from the central repository.
3- If the Jars are not available in the central repository, then Maven will look for them in the remote repository.
4- We can configure the remote repository in the <POM.xml> to enable the automatic downloads of dependencies.
Consider the example which you can see below. It displays the configuration of a remote repository in the <POM.xml> file. You need to specify the <ID> and <URL> of the repository where the jar is available.
<repositories>
     <repository>
         <id>libraryId</id>
         <url>http://comanyrepositryId</url>
     </repository>
</repositories>
Here comes a step-by-step tutorial, where we’ll first create a small project with Maven. And then, will create a few tests with TestNG and Selenium 2.0.
Finally, you’ll get to see the steps of running Webdriver tests using Maven.
Install the Maven plug-in in Eclipse.
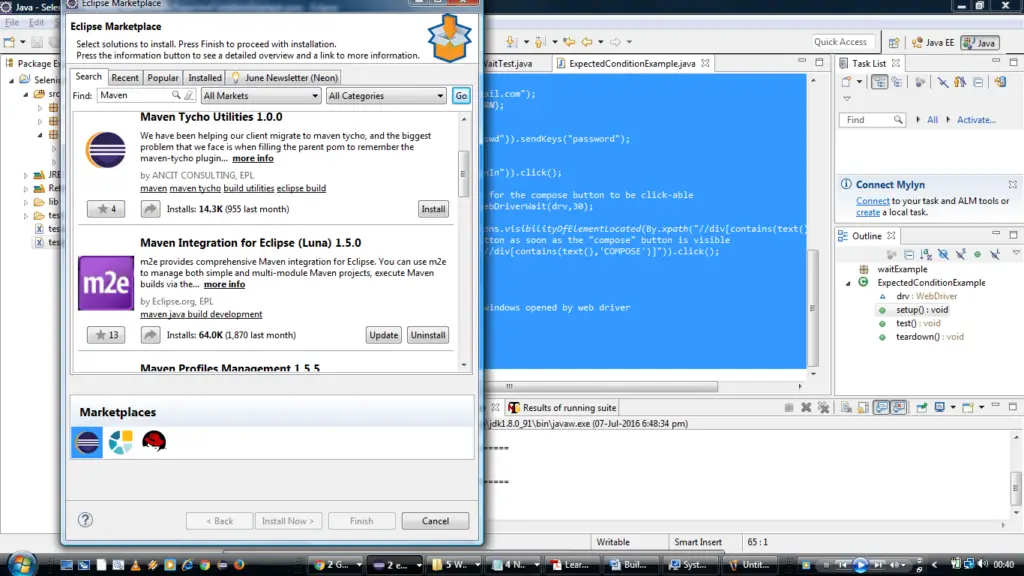
To add the Maven plug-in to Eclipse IDE, navigate to Help->Eclipse Marketplace.
Search Maven and install <Maven Integration for Eclipse> from the searched options.
After installation, you have to restart the Eclipse IDE.
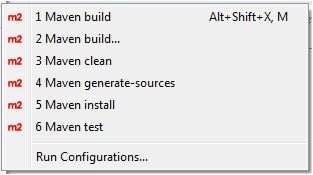
Then, go to the project, right-click on the <POM.xml>, and verify that all the options are available as shown below.
Note: For a quick note, you can also run Maven from the command line. To do so, you have to download the latest version of the Maven package from the Apache website.
Set up a Maven Project in Eclipse.
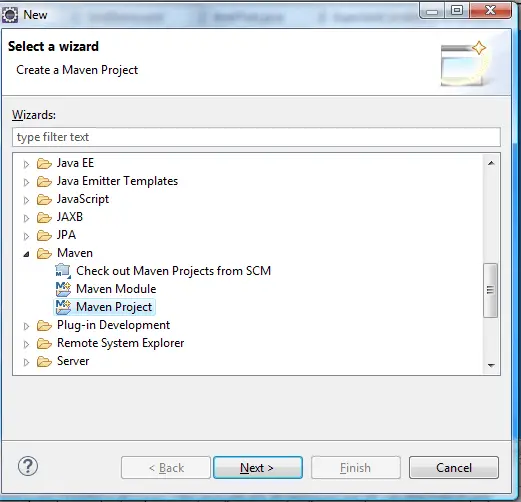
Step-1: Navigate to File ->New->Others->Maven->Maven Project.
And then click Next. See the below screenshot.
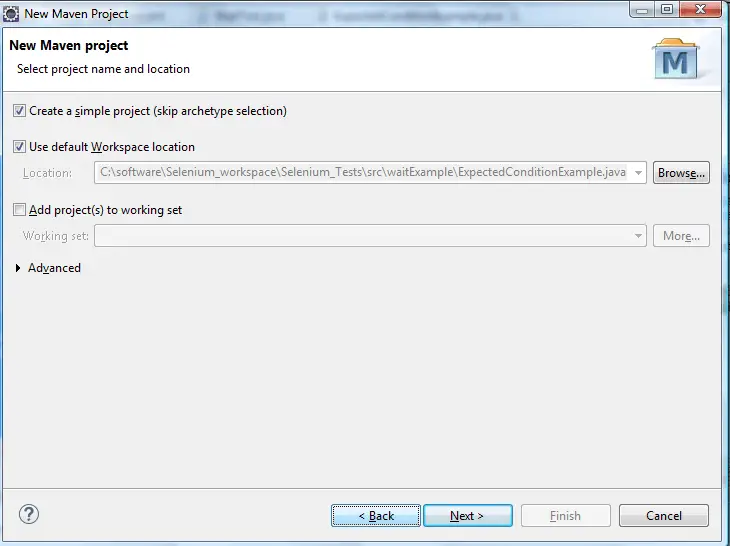
Step-2: Select the Checkbox “Create a simple project” (skip archetype selection) and click Next.
Refer to the embedded screenshot.
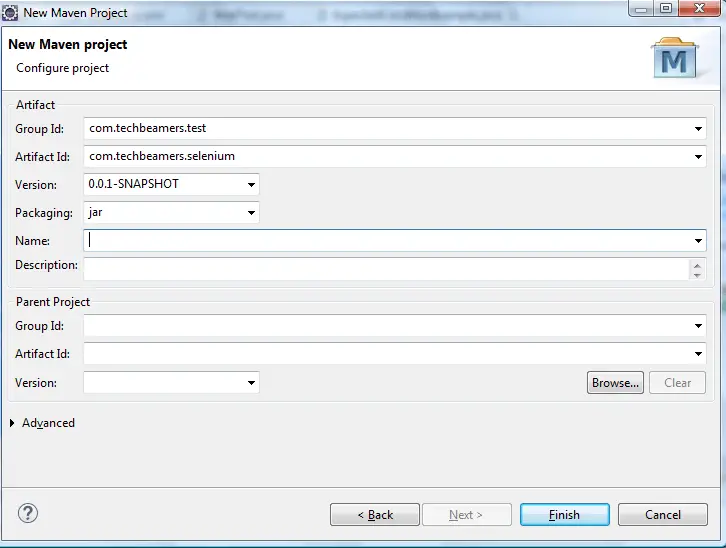
Step-3: Provide Group Id and Artifact Id in the window and Click Finish.
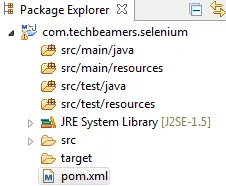
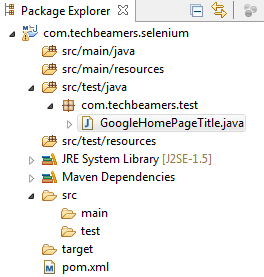
Step-4: After finishing, you will find the project structure created below. POM.xml created is like that which is used to download all dependencies.
By default, the contents of the POM.xml file are as follows:
Step-5: Now add the dependencies for Selenium ll.
Selenium Maven artifacts are available from the following central repository.
- https://repo1.maven.org/maven2/org/seleniumhq/selenium/
For the Selenium library, add the following dependencies in <POM.xml>.
<dependency>
       <groupId>org.seleniumhq.selenium</groupId>
       <artifactId>selenium-java</artifactId>
       <version>2.53.1</version>
</dependency>
And following is the dependency for JUnit.
<dependency>
      <groupId>junit</groupId>
      <artifactId>junit</artifactId>
      <version>4.9</version>
</dependency>
In a similar manner, if we want to add any other third-party jar, then include them in the same fashion.
Step-6: Final POM.xml contents are as follows.
<project xmlns="http://maven.apache.org/POM/4.0.0" xmlns:xsi="http://www.w3.org/2001/
XMLSchema-instance" xsi:schemaLocation="http://maven.apache.org/POM/
4.0.0 http://maven.apache.org/xsd/maven-4.0.0.xsd">
  <modelVersion>4.0.0</modelVersion>
  <groupId>com.techbeamers.test</groupId>
  <artifactId>com.techbeamers.selenium</artifactId>
  <version>0.0.1-SNAPSHOT</version>
<dependencies>
<dependency>
       <groupId>org.seleniumhq.selenium</groupId>
       <artifactId>selenium-java</artifactId>
       <version>2.53.1</version>
</dependency>
</dependencies>
</project>
Step-7: Maven will download all the dependency jars into a local repository called <.m2>.
M2 folder is located at <C:\Users\username\.m2\repository>.
All the jars get downloaded to a folder called the repository. It resides in the .m2 folder. Maven will create separate folders for the different versions and different group ids.
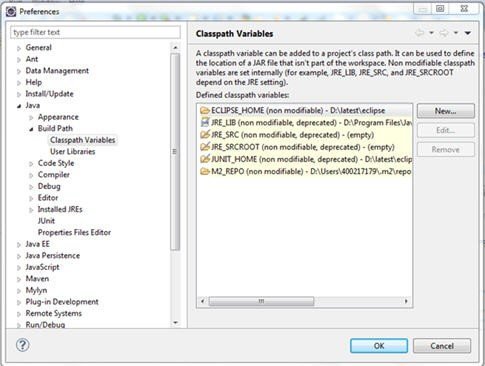
Step-8: If the <m2> folder doesn’t populate in Maven dependencies, then you can add those jars manually.
- Open the Eclipse Windows ->Preference.
- Navigate to Java->Build Path->Classpath Variables.
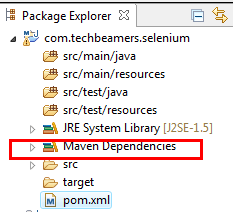
Step-9: Upon successful setup, you will find the Maven Dependencies folder below which will have the required dependency jar for the project.
Writing Selenium Webdriver Test and Build Using Maven.
First of all, let’s create a simple example using Selenium and TestNG. Then, we’ll be running Webdriver tests using Maven.
Step-1: Create a new test class under the package <com.techbeamers.test>.
In this, we’ll add code to verify the title of the Google home page. Right-click on the package Select New->Class and name the class as <GoogleHomePageTitle>.
Step-2: Now add the following code to the test class.
package com.techbeamers.test;

import org.openqa.selenium.WebDriver;
import org.openqa.selenium.firefox.FirefoxDriver;
import org.testng.Assert;
import org.testng.annotations.AfterClass;
import org.testng.annotations.BeforeClass;
import org.testng.annotations.Test;


public class GoogleHomePageTitle {

	private WebDriver driver;
	String URL = "http://google.com";

	@BeforeClass
	public void testSetUp() {

		driver = new FirefoxDriver();
	}

	@Test
	public void verifyGooglePageTittle() {
		driver.navigate().to(URL);
		String getTitle = driver.getTitle();
		Assert.assertEquals(getTitle, "Google");
	}

	@AfterClass
	public void tearDown() {
		driver.quit();
	}
}
Step-3: Running Webdriver test cases using maven (Surefire plug-in).
1- Add the following snippet in <POM.xml> to set the Surefire Plug-in for running the tests.
<groupId>org.apache.maven.plugins</groupId>
<artifactId>maven-surefire-plugin</artifactId>
<version>2.19.1</version>
2- This plug-in will come into the picture during the testing phase of the software build lifecycle to execute tests.
3- We will also add the TestNG dependency to the <POM.xml> file.
 <dependency>
    <groupId>org.testng</groupId>
    <artifactId>testng</artifactId>
    <version>6.8.8</version>
 </dependency>
4- We have a test <verifyGooglePageTitle()> in our test class. We’ll also include it in the <POM.xml> file.
<?xml version="1.0" encoding="UTF-8"?>
<!DOCTYPE suite SYSTEM "http://testng.org/testng-1.0.dtd">
<suite name="Suite" parallel="none">
  <test name="Test">
    <classes>
      <class name="com.techbeamers.test.GoogleHomePageTitle"/>
    </classes>
  </test> <!-- Test -->
</suite> <!-- Suite -->
Finally, the <POM.xml> would look something like this.
Final POM XML.
<project xmlns="http://maven.apache.org/POM/4.0.0" xmlns:xsi="http://www.w3.org/2001/
XMLSchema-instance" xsi:schemaLocation="http://maven.apache.org/POM/
4.0.0 http://maven.apache.org/xsd/maven-4.0.0.xsd">
  <modelVersion>4.0.0</modelVersion>
  <groupId>com.techbeamers.test</groupId>
  <artifactId>com.techbeamers.selenium</artifactId>
  <version>0.0.1-SNAPSHOT</version>
  <properties>
		<jre.level>1.8</jre.level>
		<jdk.level>1.8</jdk.level>
  </properties>
  	<build>
		<plugins>
			<!-- Compiler plug-in -->
			<plugin>
				<groupId>org.apache.maven.plugins</groupId>
				<artifactId>maven-compiler-plugin</artifactId>
				<configuration>
					<source>${jdk.level}</source>
					<target>${jdk.level}</target>
				</configuration>
			</plugin>
			<!-- Below plug-in is used to execute tests -->
			<plugin>
				<groupId>org.apache.maven.plugins</groupId>
				<artifactId>maven-surefire-plugin</artifactId>
				<version>2.19.1</version>
				<configuration>
					<suiteXmlFiles>
						<!-- TestNG suite XML files -->
						<suiteXmlFile>testng.xml</suiteXmlFile>
					</suiteXmlFiles>
				</configuration>
			</plugin>
		</plugins>
	</build>
 <dependencies>
 <dependency>
       <groupId>org.seleniumhq.selenium</groupId>
       <artifactId>selenium-java</artifactId>
       <version>2.53.1</version>
 </dependency>
 <dependency>
			<groupId>org.testng</groupId>
			<artifactId>testng</artifactId>
			<version>6.8.8</version>
 </dependency>
 </dependencies>
</project>
Step-4: Test Execution.
We are now ready as we’ve completed the required setup. And only the following steps are remaining before running the Webdriver tests using Maven.
- Right-click on the <POM.xml> and Select Run As->Maven clean.
- And after that Select Run As-> Maven install.
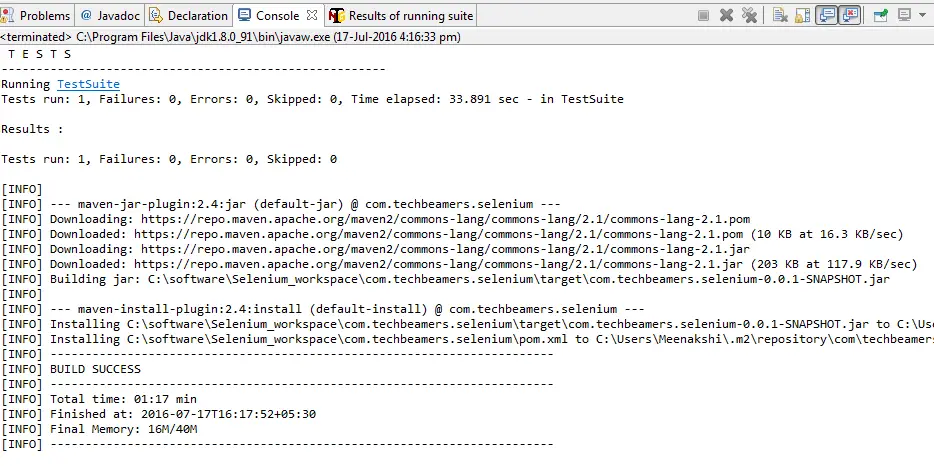
Finally, you would see the following as output on the console.
Final Thought – Run Webdriver Tests Using Maven
It was a comprehensive tutorial on What is Maven, Why is it useful, and how to use it for running Webdriver tests.
And hopefully, you all would like it and be able to use the concept in your projects.
All the Best,
TechBeamers.


