Greetings readers, today we thought to share the Node-RED installation steps which can help you in setting it up in 10 minutes. It’s one of the most trending tools for Internet of Things applications and is being widely used to monitor communication between IoT devices. Software developers or IT enthusiasts can easily download it and follow the Node-RED installation steps given here.
Built with node js support, Node-RED is a leading GUI application and platform-independent interface engineered by IBM for linking the Internet of Things. Though, IBM has already contributed to the Open Source community. IBM presented an open invitation to the developers of the world to add their customization into Node-RED.
Also Check: Quick Overview of Linux EVAL Command with Examples
What is Node-RED?
Node-RED as its name reflects was developed using the Node.js framework to bring out a lightweight and browser-oriented user interface. It comes with a highly interoperable design which allows it to link both physical and digital types of things together.
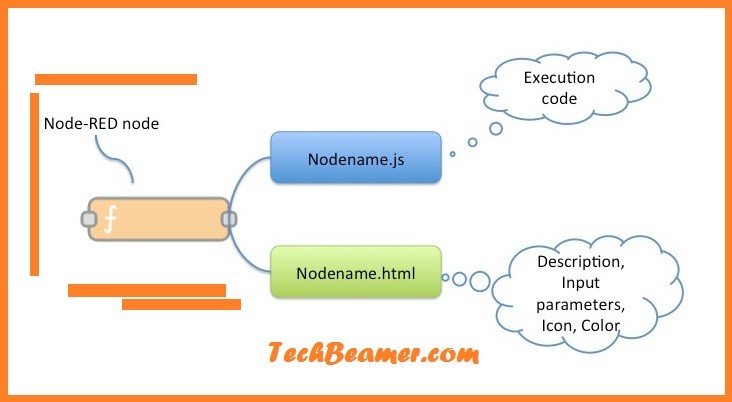
For using Node-RED one doesn’t need to be a seasoned programmer. Software engineers with less coding expertise can also contribute to the growth of this field. Most of the programming tasks in Node-RED, you can do visually using the pre-defined function nodes. You can perform drag-and-drop operations on these nodes and place them on Canvas to create the desired workflow. Also, it supports new functionality with the help of JavaScript files.
Node-RED doesn’t entirely replace the need for writing the code but significantly helps in reducing development efforts. It enables the developers to focus on creating earth-shattering applications rather than duplicating efforts by writing the same code over and over again.
Node-RED supports an event-based mechanism which makes it very easy to control the interconnection between multiple hardware. It is portable with all leading web browsers to allow easy formation of functional workflows related to the Internet of Things. The lightweight nature of this application enables it to run on smaller devices like the BeagleBone and Raspberry Pi.
Must Read: The Best 30 Node.js Interview Questions and Answers
Let’s start the Node-RED installation.
Now we’ll demonstrate the steps to get started with Node-RED. We’ll be using the Ubuntu 14.04 server for Node-RED installation. There are a few main configuration steps that you need to perform before it’s ready to run on your setup.
1- Set up Node.js before Node-RED installation.
1.1- Installing Node.js.
The very first item to install is <Node.js>. It’s a JavaScript-based ultra-light-weight development platform that is getting more popular day by day.
Node-RED works with Node.js version 0.10.x and 0.12.x. Hence, we’ll download and install the latest <Node.js> version. So, open up a terminal window. Press CTRL+T to launch the terminal or select the terminal option from the desktop menu.
Note: Make sure you log in as a root user, or you will use <sudo> if running as a standard user.
1.2- Removing the previous Node.js version.
You can skip these steps if you are installing Node.js for the first time. Else run the below commands to remove a previous Node.js installation.
$ dpkg --get-selections | grep node

techbeamers-node               install
node                           install
If you find any previous “node” installed then run the following command to wipe it out entirely.
$ sudo apt-get remove --purge node
1.3- Perform the Node.js installation.
In the next set of instructions, we’ll run commands to install the latest version of Node.js.
Here is the command that will install and add node js support.
$ sudo apt-get install node.js
After setting up the node js server, move to install the Node Package Manager i.e. <npm>, and run the below command.
$ sudo apt-get install npm
Create a symbolic link with the name “node” for “node.js“. It’s a standard term that many Node.js tools use frequently.
$ sudo ln -s /usr/bin/nodejs /usr/bin/node
Test the Node.js installation by executing the following commands:
$ node -v
v4.2.6

$ npm -v
3.5.2
2- Configuring Node-RED.
2.1- Setting up Node-RED.
We have successfully configured Node.js, and can now jump on to downloading the Node-RED. The latest Node-RED version can be fetched from its GIT repository so that we can work on its most recent version updated with any new commits.
To download from GIT, you must make sure that you have the GIT package installed. If it is not there, run the following command to get the GIT running on your system.
$ sudo apt-get install git-core
After successfully installing GIT, navigate to your home directory to continue with the Node-RED installation.
We’ll now list out the steps that you’ll need to run for Node-RED.
1- First, clone the Node-RED repository, and then install it using the <npm> command.
2- NPM is the Node Package Manager that we’d earlier set up during the Node.js installation.
$ cd ~
$ git clone https://github.com/node-red/node-red.git
$ cd node-red
$ sudo npm install
2.2- Starting Node-RED server.
Now we have come to the point where you are just a shot away from testing your first bit with Node-RED. Just double-check that you are still in the </home/node-red/> directory and set off the following command.
$ sudo node red.js
The above command would release a lot of information onto the screen. You could see a few errors about missing packages and obviously the success messages. To verify that Node-RED is running, locate the following line in the console log.
Node-RED available on the default 1880 port...
Now we are all set to open the Node-RED session in the browser. Open your default browser and type the following URL to see the Node-RED blazing.
http://localhost:1880
You’ll see an empty workspace opening in the browser window with the default but functional “nodes” tile on the left side of the screen. Start playing around with the drag-and-drop feature to link the nodes together.
Final Thought.
Hopefully, this article will help you kick-start the Node-RED tool on Ubuntu. Do write to us about the topic of your interest, and we’ll add it to our writing roadmap.
In the next article, we’ll present you with a short <init.d> script to <start/stop> the Node-RED server and manage it as a service.
Till then Bye, Enjoy!