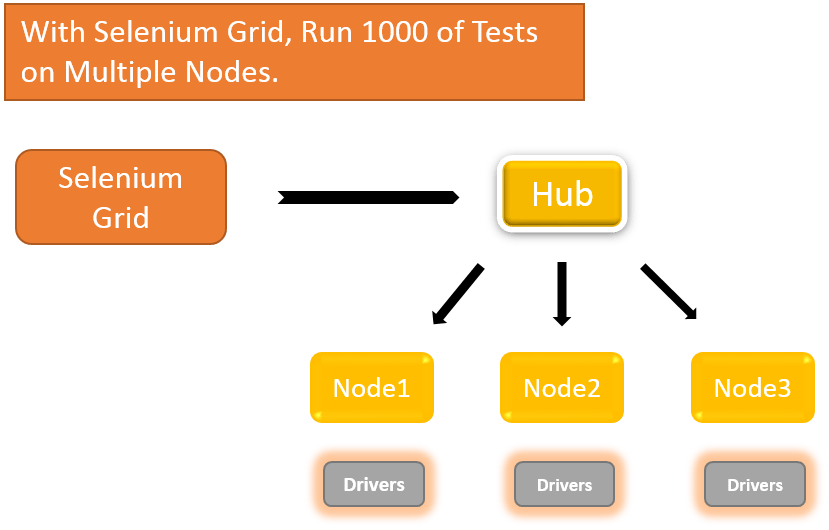
You might have heard of terms like Parallel execution and Distributed automation. The former raises your ability to handle the load and the latter supports by offloading it onto multiple nodes. In Webdriver automation, it’s the Selenium Grid which is capable of enabling both these features. In this post, we’ll tell you the easiest steps to download Selenium Grid and walk you through its configuration. Also, you’ll get to know how to set up a Hub and Node for Selenium Grid.
Later, in this post, we’ll further teach you to configure the node for multiple browsers to speed up test execution. You might also like to read our another post presenting the Selenium Grid Webdriver code to simulate the test execution. There you’ll get the working Java code to run Selenium for load testing.
Selenium Gris is indeed a unique and powerful testing tool which can run thousands of tests by distributing them on multiple machines. It not only executes the tests concurrently but can make use of different browsers to run the tests. You can even utilize it for cross-browser testing. So, it is essential that you first download Selenium Grid and start inspecting its impact.
Once you get the Selenium grid up and running, there is no need to wait for the long hours to let the automation finish. It’ll amazingly speed up the test execution so that you can provide timely feedback to the Dev team. Also, if you are good in Java coding, then you can update your project to use Selenium for load testing. Let’s now start to understand this Selenium component in detail.
List of Topics: Download and Set up Selenium Grid
- What is Selenium Grid?
- Benefits of Using Selenium Grid.
- What are Hub and Nodes?
- Download Grid and Set up FF, IE, and Chrome.
- Selenium Grid Parameters.
What is Selenium Grid?
Selenium Grid is a member of Selenium Suite that specializes in running multiple tests across different browsers, operating systems, and machines in parallel. It’s based on the hub-node concept. It specifies that all tests should run on a single machine called a hub but they get executed on different machines called nodes.
Benefits of Using Selenium Grid.
- Selenium Grid allows running the tests against different browsers, operating systems, and machines all at the same time.
- It’ll ensure that the application you are testing is fully compatible with a wide range of browser-O.S. combinations.
- Selenium Grid saves time in the execution of test suites.
What are Hub and Nodes?
The Hub.
- The hub is the central point where you load your tests to be run.
- There should only be one hub in a grid.
- The hub is launched only on a single machine, say, a computer with OS Windows and a browser like Chrome.
The Nodes.
- Nodes are the Selenium instances that will execute the tests that you loaded on the hub.
- There can be one or more nodes in a grid.
- Nodes can be launched on multiple machines with different platforms and browsers.
- The machines running the nodes may not necessarily have the same platform as that of the hub.
Download Selenium Grid and Set up FF, IE, and Chrome.
We will discuss the setting up of Selenium Grid in this section taking the example of two machines. The first machine will be the system that will run the hub while the other machine will run a node. For our ease, we will notify the machine where the hub runs as “Machine A” while the machine where the node runs will be “Machine B”.
In order to set up a machine as a hub or node, we have to run some commands on them. For that, we should note down the IP addresses of both the machines. Let’s assume that Machine A has an IP address of 192.168.1.6 while Machine B has an IP of 192.168.1.7.
Following are the step by step instructions to help you install and download Selenium Grid.
Step-1: Download Selenium Grid.
- Selenium Grid comes built into the Selenium Standalone Server. So to get started we’ll need to download the latest version of it from
http://docs.seleniumhq.org/download/. - Place the Selenium Server .jar file anywhere in your Hard Drive. Let’s place it into the D drive of both the Machine A and Machine B. This has completed installation of Selenium Grid. The following steps will launch the hub and the node.
Step-2: Setup Hub Machine.
- After you download the Selenium grid, let’s set up the hub machine. For this, move to the hub Machine A. Open the command prompt and navigate to the directory where we placed the Selenium Server.
- On the command prompt, type the following command.
java -jar selenium-server-standalone-2.53.0.jar -role hub- The hub is launched successfully. Your command prompt should look similar to the image below.
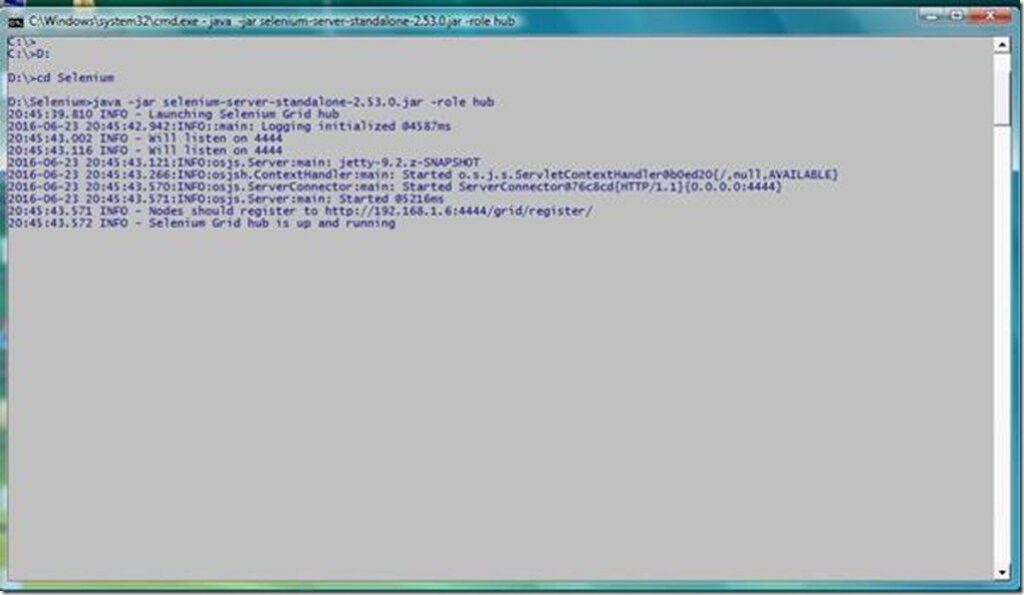
Step-3: Launching Hub Console.
We can verify whether the hub setup in the above step is running successfully or not by using a browser. Selenium Grid, by default, uses Machine A’s port 4444 for its web interface. Open up a browser and go to http://localhost:4444/grid/console.

To check if Machine B can access the hub’s web interface by launching a browser, send http://localhost:4444/grid/console command in the browser. Just replace the <localhost> in this command with IP Address of Machine A.
Step-4: Set up Node Machine.
- Now that we have set up the hub node successfully. Now we will set up the node machine. Open the command prompt on Machine B.
- Navigate to the directory where we placed the Selenium Server and type the command given below. We used the IP address
192.168.1.6in the command because that is where the hub is running. We used port 5566; however, we can use any other port which is free.
D:\>java –jar selenium-server-standalone-2.53.0.jar -role webdriver –hub http://192.168.1.6:4444/grid/register -port 5566- On running the command, the command prompt should be similar to the image below.
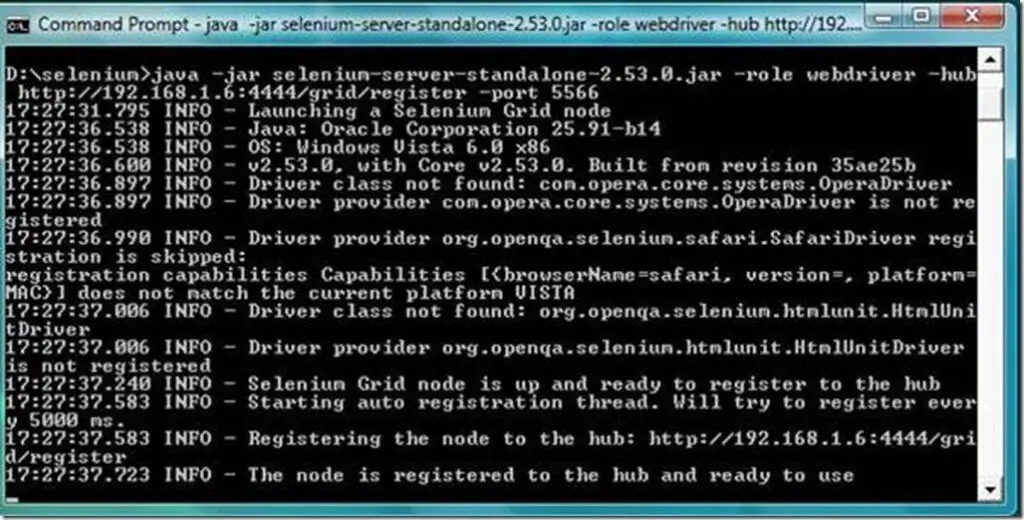
Step-5: Hub Console.
Go to the Selenium Grid web interface and refresh the page. You should see something like this.
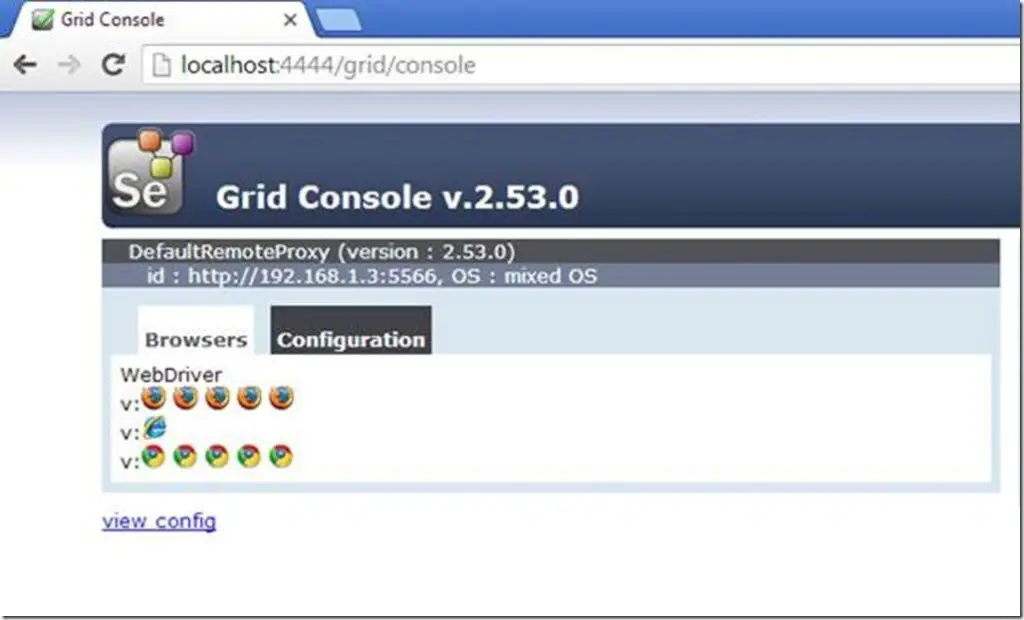
After completing this step we can say that we have already configured a simple grid. We are now ready to run a test remotely on Machine B.
You can check from the above image that it has 5 Chrome, 5 Firefox, and 1 IE browser displayed under Browser section. It indicates that by default we can use up to 5 Chrome, 5 Firefox, and 1 IE browser.
To refine the list of available browsers in the Browser section, we can specify an additional -browser parameter while registering the node. For instance, if we want to extend support of only Firefox browser on a node, we can define it by giving -browser browserName=firefox, which would look like this.
java -jar selenium-server-standalone-2.53.0.jar -role webdriver -hub http://192.168.1.6:4444/grid/register -browser browserName=firefox –port 5566
Step-6: Launch Internet Explorer Node.
- To launch the Internet Explorer Node, we have to download the Internet Explorer driver on the node machine.
- For IE driver, download it from the SeleniumHQ site, the appropriate file based on your machine’s OS. After you have downloaded the IE driver, unzip the Exe file and place it in the same folder as selenium standalone server.
- Open a Command prompt and navigate to the drive where IE driver is installed and type the following command to launch IE.
java –Dwebdriver.ie.driver=IEDriverServer.exe -jar selenium-server-standalone-2.53.0.jar -role webdriver -hub http://192.168.1.6:4444/grid/register -browser browserName=ie –port 5568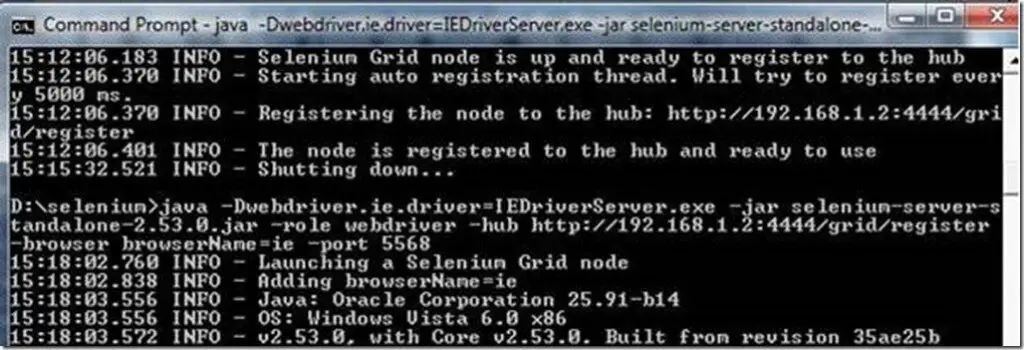
Step-7:
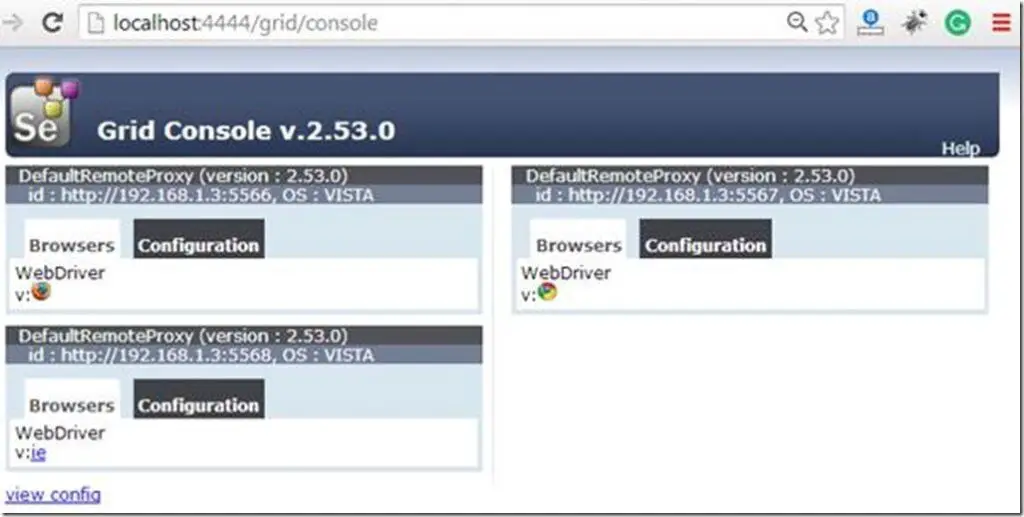
After executing the command, come back to the Hub. Navigate to the URL – http://localhost:4444/grid/console and the Hub would now display the IE node attached to it.

Step-8: Launch Chrome Node.
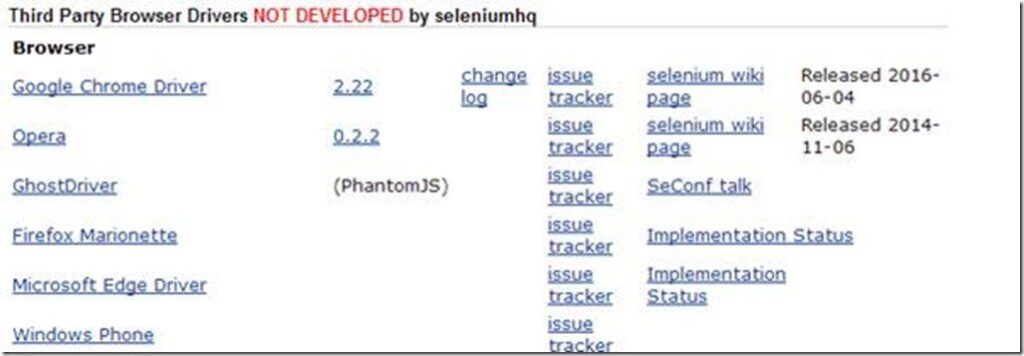
To download the Chrome driver, open SeleniumHQ site and go to its download section. After that, navigate to Third Party Browser Drivers area and click on the version number <2.22> as shown below.
Step-9: Download the driver based on the architecture of your OS on the node machine.
After you have downloaded the Chrome driver, unzip the Exe file and place it in the same folder as selenium standalone server.
Open Command prompt and navigate to the drive where Chrome driver is installed and type the following command to launch Chrome.
java –Dwebdriver.chrome.driver=chromedriver.exe -jar selenium-server-standalone-2.53.0.jar -role webdriver -hub http://192.168.1.6:4444/grid/register -browser browserName=chrome –port 5567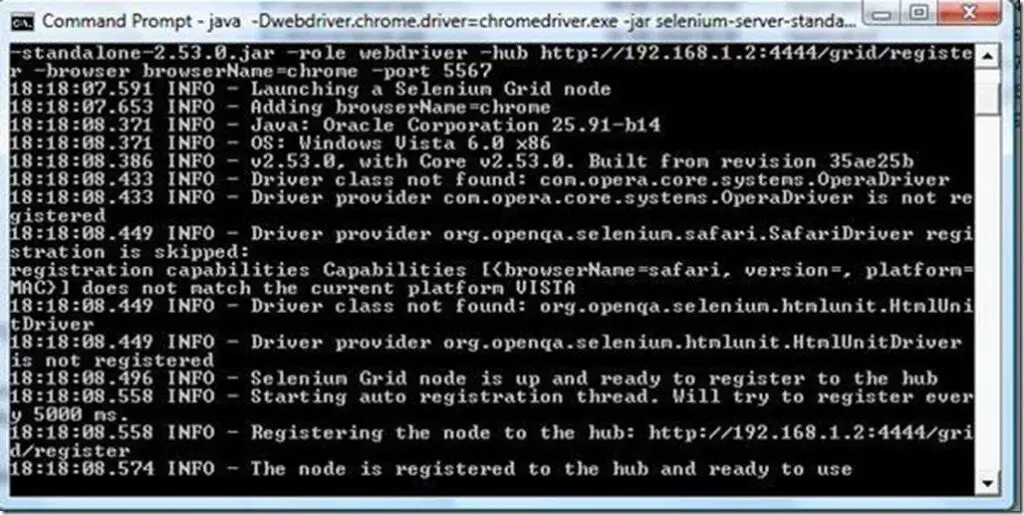
Step-10:
After executing the command, come back to the Hub. Navigate to the URL – http://localhost:4444/grid/console and the Hub would now display the Chrome node attached to it.
Selenium Grid Parameters.
There are many such parameters that we can use at run time. Let’s discuss some of these Optional Parameters here.
Basic level Parameters.
- port 4444 (4444 is default).
- host <IP | hostname> specify the hostname or IP. This is usually not needed as it is determined automatically. For configurations like network with VPN, specifying the host might be necessary.
- timeout 30 (300 is default) is the timeout in seconds before the hub automatically releases a node that hasn’t received any requests for more than the specified number of seconds. After this time, the node will be released for another test in the queue. This helps to clear client crashes without manual intervention. To remove the timeout completely, specify -timeout 0 and the hub will never release the node.
- maxSession 5 (5 is default) The maximum number of browsers that can run in parallel on the node. This is different from the maxInstance of supported browsers (Example: For a node that supports Firefox 3.6, Firefox 4.0 and Internet Explorer 8, maxSession=1 will ensure that you never have more than 1 browser running. With maxSession=2 you can have 2 Firefox tests at the same time, or 1 Internet Explorer and 1 Firefox test).
Advanced level Parameters.
- browser <params> If the browser is not set, a node will start with 5 Firefox, 1 Chrome, and 1 IE instances (assuming it’s on a windows box). This parameter can be set multiple times on the same line to define multiple types of browsers. Parameters allowed for -browser: browserName={android, chrome, firefox, HTML unit, internet explorer, iPhone, opera} version={browser version} firefox_binary={path to executable binary} chrome_binary={path to executable binary} maxInstances={maximum number of browsers of this type} platform={WINDOWS, LINUX, MAC}.
- registerCycle N = how often in ms the node will try to register itself again.
- maxInstances value sets the limit for the no. of browsers to run on a node.
- For example – If you want to use 2 Firefox and 2 IE, then you should start the node using the <maxInstances> setting.
java -jar selenium-server-standalone-2.41.0.jar -role webdriver -hub

http://localhost:4444/grid/register -port 5556 -browser browserName=firefox,maxInstances=3- Maximum Instance can be verified under the configuration tab.
Conclusion
Hope you would get know about the desired steps to download Selenium Grid and set up the multiple browsers for cross-platform testing. To learn about the Selenium grid, you must first try to learn the basics. That’s what we explained in the above post.
In the next post, you’ll find the Selenium Webdriver code to run multiple tests on the grid node. Also, it would give you an idea of using Selenium for load testing. So don’t miss to read it.
As such posts demand a lot of research as well as efforts, so if you wish to support then do like or share the post.
Best,
TechBeamers.

