In this tutorial, we will create a Selenium Java app to find the blog rank for a keyword from Google search results. This exercise is a perfect example of automated testing using Selenium. It will not only boost your Selenium skills but also provide you with real-time project experience.
We thought about such an idea only because it will evidently benefit beginners learning automation and is also relevant for bloggers. We request readers to go through it carefully to get the most out of this brainstorming.
Bloggers may also utilize it to check their blog rank for a specific keyword in Google search results. It is a practical Selenium tutorial that covers all steps to create a Selenium project. Hence this Selenium tutorial is a little different from the stuff available on other websites.
Selenium Java Project to Find the Rank in Google
What is Blog Rank?
Blog rank is the location of a blog in Google Search Results when a search takes place for some keyword. It could be useful for newbie bloggers who want to see how their post is fairing in Google Search Results.
How does the Rank Finder application work?
Let’s understand the functionality of the application in detail. The blog rank finder application will be a command line application. It will require three inputs before it displays the blog location in Google search results. You would be able to execute the app from the Eclipse IDE and the command line as well.
The three inputs that the application will need are:
- Name of the blog or website which you want to check rank
- The search keyword for Google search
- The search threshold value or the number of pages to crawl
Let’s now watch over the steps that you should be doing to create the blog rank finder application. We’ve split the build process into four levels to give more clarity to our readers. We’ve kept the step description quite clear so you can easily imitate all the steps in your working environment.
Create the Selenium Java app to find the rank of a blog
Step#1) Create a Java Project using Eclipse
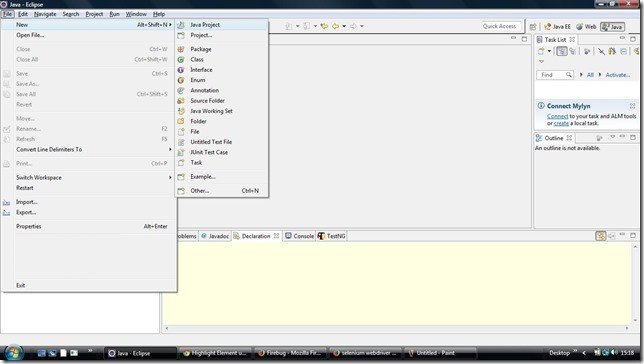
Start Eclipse and create a new “Java” project as shown in the below screenshot.
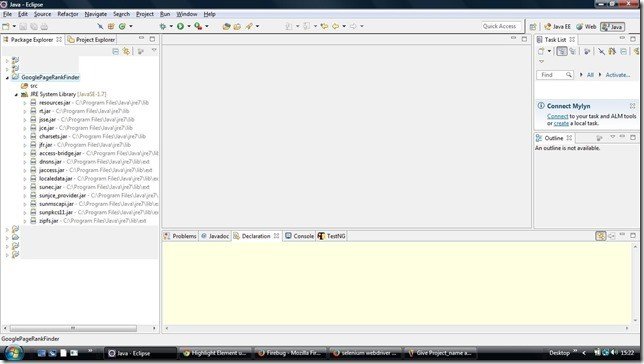
Assign the project a name say “GooglePageRankFinder” and save.
Step#2) Add Selenium libraries (jar files) to your project
If you already have the required libraries on your system, just skip to the next step. Otherwise, read the details on downloading and adding libraries. Please visit the below URL.
List of Jar Libraries Required to Build Selenium WebDriver Project in Java
For adding libraries to the project, right-click on it and Select “Build Path>>Add Libraries” to add them.
Please refer to the snapshot given below. It will help you to select and add the libraries.
For your note, we are using Firefox WebDriver in this demonstration. So you must have the Firefox browser on your system to run this application.
Step#3) Add source code to the project
So far we’ve added the libraries, but there is still no source code. To add the source, please do the following substeps.
- Right-click on the project’s “src” folder and select a “Package” to add.
- Name the new package as <rankFinder>.
- Next, select the <rankFinder> package and a “Class” as “PageRank.”
- It will get the “PageRank.java” file created in the project.
- Now we’ve attached the source code of the “PageRank.java” in the below code snippet. You need to copy and paste the source code into your “PageRank.java” file.
package rankFinder;

import java.io.InputStreamReader;
import java.util.List;
import java.util.Scanner;
import java.util.concurrent.TimeUnit;

import org.openqa.selenium.By;
import org.openqa.selenium.JavascriptExecutor;
import org.openqa.selenium.Keys;
import org.openqa.selenium.WebDriver;
import org.openqa.selenium.WebElement;
import org.openqa.selenium.firefox.FirefoxDriver;


public class PageRank {

	private static WebDriver driver = null;
	private static WebElement element = null;

	public static void main(String[] args) {


		// create a scanner so we can read the command-line input
	    Scanner scanner = new Scanner (new InputStreamReader(System.in));

	    //  prompt user to Enter the search criteria in Google
	    System.out.print("Enter your search keyword: \n");

	    // get their input as a String
	    String keyword = scanner.nextLine();

	    // prompt user to Enter the website to search
	    System.out.print("Enter the target Website: \n");

	    // get their input as a String
	    String websiteName = scanner.nextLine();

	    // prompt user to Enter the number of pages to search
	    System.out.print("Enter Total number of pages to search: \n");

	    // get the page number as an int
	    int pageNo = scanner.nextInt();

	    driver = new FirefoxDriver();
		Boolean found = false;
		driver.manage().window().maximize();
		driver.manage().timeouts().implicitlyWait(10, TimeUnit.SECONDS);
		driver.get("http://www.google.com");

		element = driver.findElement(By.id("lst-ib"));
		//element.sendKeys("Selenium WebDriver Interview questions");
		element.sendKeys(keyword);
		element.sendKeys(Keys.RETURN);
		int page = 0;
		while (!found && page<=pageNo){
		try{
		List<WebElement> list = driver.findElements(By.className("_Rm"));
		//System.out.println(list.size());
		Thread.sleep(10000);
		page++;
		for(int i=0;i<list.size();i++)
		{
		String link = list.get(i).getText();
		//System.out.println(link);
		if(link.contains(websiteName))
		{
			System.out.println("Website Found at Page" + page);
			found = true;
			fnHighlightMe(driver,list.get(i));
			break;
		}
		/*else
		{
			System.out.println("Website Not Found in page" + page);
		}	*/
		}
		}catch (Exception e)
		{
			   System.out.println(e);
		}

		if (!found) {
			try {
		         driver.findElement(By.xpath(".//*[@id='pnnext']/span[2]")).click();
		         Thread.sleep(10000);
			}catch (Exception e)
			{
				   System.out.println(e);
			}

		//driver.manage().timeouts().pageLoadTimeout(100, TimeUnit.SECONDS);
		}
		}
        //driver.close();
	}

	 public static void fnHighlightMe(WebDriver driver,WebElement element) throws InterruptedException{
		  //Creating JavaScriptExecuter Interface
		   JavascriptExecutor js = (JavascriptExecutor)driver;
		   js.executeScript("arguments[0].scrollIntoView();", element);
		   //for (int iCnt = 0; iCnt < 3; iCnt++) {
		      //Execute javascript
		         //js.executeScript("arguments[0].style.border='4px groove green'", element);
		   js.executeScript("arguments[0].setAttribute('style', arguments[1]);",element, "color: red; border: 3px solid red;");
		         Thread.sleep(1000);
		     //    js.executeScript("arguments[0].style.border=''", element);
		   //}
		 }

}
Finally, you are successfully able to set up the project. Now it’s time to build the application. In Eclipse, projects get built by default which generates the class file as well. In case the auto-build setting is not enabled, use Eclipse’s “Project>>Build Project” menu option to compile the application.
If you’ve correctly followed all the above steps, you should be successfully able to build the application. If there are any errors, do let us know for help.
Step#4) Execute the “GooglePageRankFinder” application
You can now run the application using the following substeps from Eclipse.
- Execute the application from the “Run>>Run” menu. Or you can also run it using the “CTRL+F11” keyboard shortcut.
- Alternatively, you can execute it from the “Run>>Debug” menu. In debug mode, it is allowed to insert breakpoints into the code.
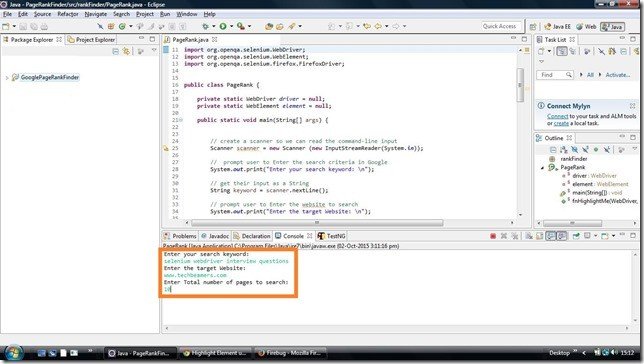
After execution, the app will ask for three inputs as described earlier. Follow the attached snapshot for clarity.
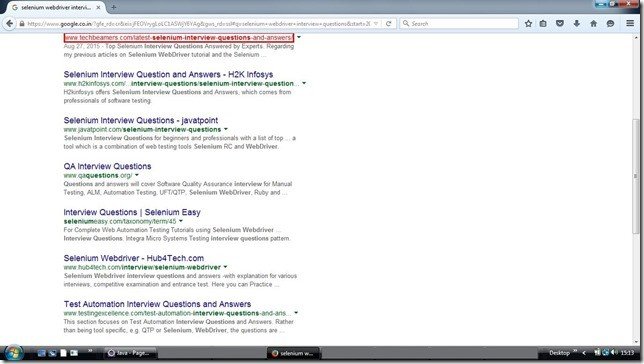
Once you enter the required inputs, the application will open the browser and perform the search. It’ll crawl to the page where your blog appears in Google search results. The app will select and highlight the blog link from the Google search result. You can verify the output from the attached snapshot. If the page threshold limit gets exhausted, the application will return automatically.
Quick Wrap-up – Find the Rank of a Blog Using Selenium
We hope that you like the Selenium tutorial and the implementation of the blog rank finder application. You are also welcome to enhance it further to your imagination. You can alter it to run on different browsers as well. In case you fall into any issues, do text us, email us, or use the comment box given below to reach us. We surely will get back to you.
You can also help us by sharing this post with your friends and the social media you frequently use.
Keep Sharing Be Successful!
Best,
TechBeamers


