In this post, we are again going to teach you an out-of-the-box feature of TestNG. It is none other than the TestNG factory method. In this TestNG tutorial, we’ll cover how to create multiple instances of test classes and generate load using the TestNG factory method.
And since we receive a lot of visitors who are just beginning their automation journey, it’s customary to start with a little introduction to using the TestNG framework.
The most simple way to use it is by installing the TestNG plugin to Eclipse. Alternatively, you can add it as a dependency in the POM file while using Maven as a build tool.
Introduction
Every TestNG project sources its settings from an XML file which usually has a name like <testng.xml>. It follows a <suite-test> like structure to group test cases.
1. At the root level, it starts with a <suite> tag which wraps a collection of <test> tags.
2. Each test can further contains multiple <class> tags inside the <classes> tag.
3. Every TestNG <class> has a linked reference to a Java class. It may contain one or more test methods.
4. With the help of @Test, you can annotate a Java method to run as a test in the TestNG suite.
Read more about the TestNG annotations, in case you wish to further increase your understanding.
Now, we’ll learn how to use the TestNG factory method to perform load testing. So let’s first define load testing scenarios where we’ll be using this method.
1. Run a test case multiple times which we’ve demonstrated in the previous post.
2. Set up a class with multiple test methods to run on a recurring basis. We’ll automate this scenario using the TestNG factory method in the below sections.
For this tutorial, you will also need to create a TestNG project to write test cases. To proceed, follow the below table of contents.
Table of Contents.
- What is the TestNG @Factory Annotation Method?
- What is the Use Case for Load Testing in This Tutorial?
- How to Use TestNG @Factory Annotation for Load Testing?
So let’s begin by understanding the @Factory annotation followed by a review of the load testing use case.
What is the TestNG Factory Method (@Factory Annotation)?
@Factory annotation is the implementation of the Factory design pattern in the TestNG framework. It enables the dynamic creation of tests to run them with a distinct data set that we want them to use.
What is the use case for load testing in this tutorial?
In this post, we’ll create a TestNG class <LoadTestScenario> which contains the following three test cases.
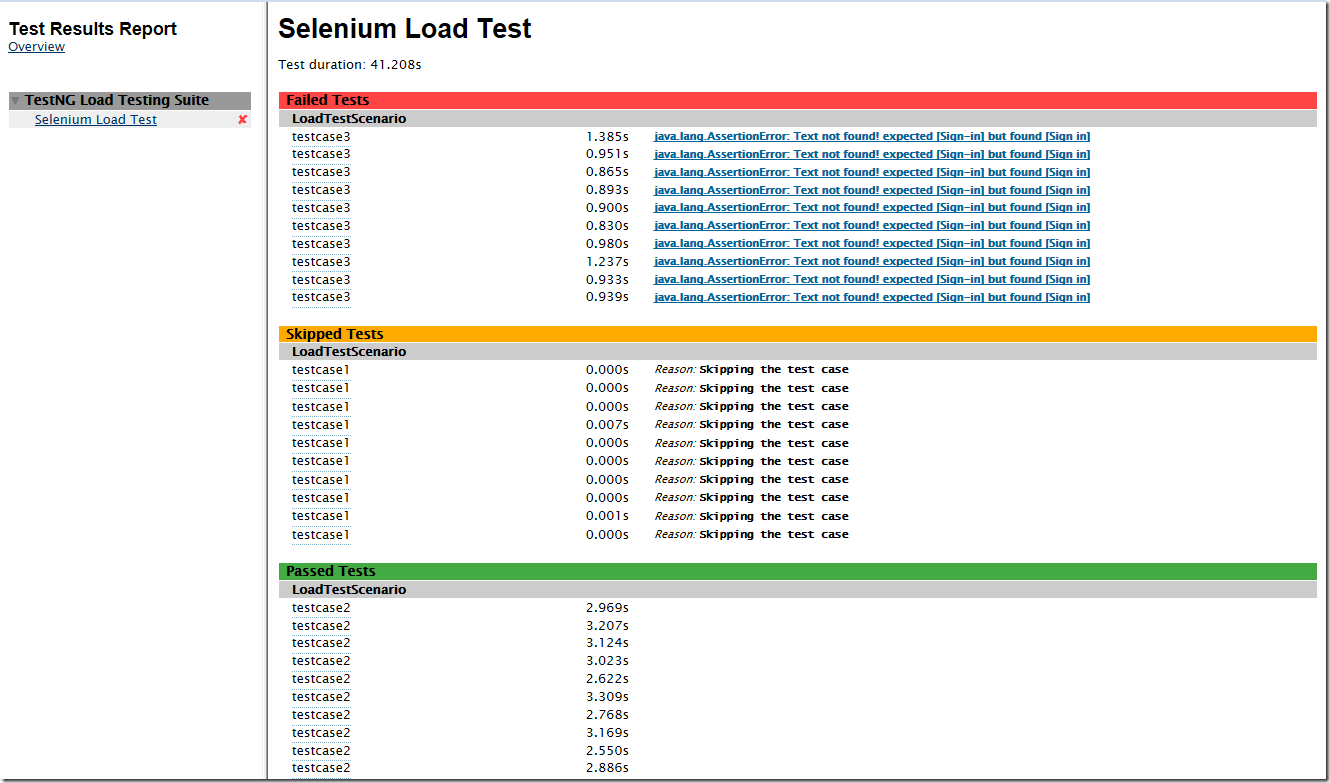
- Test case 1 – This case will run, but we are skipping it on purpose.
- Test case 2 – This case will make a web request to Google and check for the presence of the “Gmail” web link.
- Test case 3 – It is again a case in which we are failing on purpose. I’ll make a web request to Google’s home page and check for a “Sign-in” that doesn’t exist.
Next, we’ll add another class <LoadTestFactory> annotated with @Factory. It’ll create ten instances of the <LoadTestScenario> class and each of them will run the three test cases as stated above.
Please note that in a real-time load test case scenario, you should define the test cases as per your requirements.
This post is for educational purposes only. And, the objective here is to demonstrate the ability of @Factory annotation. Also, we wanted to show a test report that could display all kinds of statuses.
How to Use TestNG Factory Method for Load Testing?
Now, we’ll give you the steps to create a complete load-testing project.
1. Create a WebDriver/TestNG Project Using Maven in Eclipse.
Please refer to the below post to check out the required steps to create a project using Maven.
Here is the attached POM file which we’ve used in this TestNG load testing example. You would also need to copy/paste this file into your project.
1.1. POM File.
<project
 xmlns="http://maven.apache.org/POM/4.0.0"
 xmlns:xsi="http://www.w3.org/2001/XMLSchema-instance"
 xsi:schemaLocation="http://maven.apache.org/POM/4.0.0 http://maven.apache.org/xsd/maven-4.0.0.xsd">
 <modelVersion>4.0.0</modelVersion>
 <groupId>com.techbeamers.loadtesting</groupId>
 <artifactId>selenium-load-test</artifactId>
 <version>0.0.1-SNAPSHOT</version>
 <name>Load Testing</name>
 <description>Selenium Load Testing Example Using TestNG and Maven</description>

 <build>
  <sourceDirectory>src</sourceDirectory>
  <plugins>
   <plugin>
    <groupId>org.apache.maven.plugins</groupId>
    <artifactId>maven-compiler-plugin</artifactId>
    <configuration>
     <source>1.8</source>
     <target>1.8</target>
    </configuration>
   </plugin>
   <plugin>
    <groupId>org.apache.maven.plugins</groupId>
    <artifactId>maven-surefire-plugin</artifactId>
    <version>2.18.1</version>
    <configuration>
     <suiteXmlFiles>
      <suiteXmlFile>testng.xml</suiteXmlFile>
     </suiteXmlFiles>
     <properties>
      <!-- Setting ReportNG listeners -->
      <property>
       <name>listener</name>
       <value>org.uncommons.reportng.HTMLReporter,
        org.uncommons.reportng.JUnitXMLReporter</value>
      </property>
     </properties>
    </configuration>
   </plugin>
  </plugins>
 </build>

 <!-- Add Following Lines in Your POM File -->
 <properties>
  <selenium.version>2.53.1</selenium.version>
  <testng.version>6.9.10</testng.version>
 </properties>

 <dependencies>
  <dependency>
   <groupId>com.google.inject</groupId>
   <artifactId>guice</artifactId>
   <version>3.0</version>
   <scope>test</scope>
  </dependency>
  <dependency>
   <groupId>org.uncommons</groupId>
   <artifactId>reportng</artifactId>
   <version>1.1.4</version>
  </dependency>
  <dependency>
   <groupId>org.seleniumhq.selenium</groupId>
   <artifactId>selenium-java</artifactId>
   <version>${selenium.version}</version>
  </dependency>
  <dependency>
   <groupId>org.testng</groupId>
   <artifactId>testng</artifactId>
   <version>${testng.version}</version>
   <!--scope>test</scope -->
  </dependency>
 </dependencies>

</project>
1.2. TestNG XML file.
Copy/paste this file to your project. Make sure it stays at the root of the project alongside the POM file.
<?xml version="1.0" encoding="UTF-8"?>
<suite name="TestNG Load Testing Suite">
 <test name="Selenium Load Test">
  <classes>
   <class name="LoadTestFactory" />
  </classes>
 </test> <!-- Test -->
</suite> <!-- Suite -->
2. Define the Sample TestNG Class for Load Testing.
import java.util.concurrent.TimeUnit;

//--
import org.openqa.selenium.By;
//--
import org.openqa.selenium.WebDriver;
//--
import org.openqa.selenium.WebElement;
//--
import org.testng.Assert;
import org.testng.SkipException;
import org.testng.annotations.AfterClass;
//--
import org.testng.annotations.Test;

public class LoadTestScenario {

    private WebDriver driver;

    public LoadTestScenario(WebDriver firefox) {
        driver = firefox;
        driver.manage().timeouts().implicitlyWait(10, TimeUnit.SECONDS);
    }

    @AfterClass
    public void afterClass() {
        driver.quit();
    }

    @Test(enabled = true, description = "Intentionally Skip This Case")
    public void testcase1() {

        throw new SkipException("Skipping the test case");
    }

    @Test(enabled = true, description = "Verify Gmail Link")
    public void testcase2() {

        driver.get("http://www.google.com");

        String search_text = "Gmail";
        WebElement link = driver.findElement(By.partialLinkText("Gmail"));
        String text = link.getText();

        Assert.assertEquals(text, search_text, "Text not found!");
    }

    @Test(enabled = true, description = "Intentionally Fail This Case")
    public void testcase3() {

        driver.get("http://www.google.com");

        // We want this case to fail to display variety of status in test
        // report.
        // Correct link is "Sign in" instead of "Sign-in".
        String search_text = "Sign-in";
        WebElement link = driver.findElement(By.partialLinkText("Sign in"));
        String text = link.getText();

        Assert.assertEquals(text, search_text, "Text not found!");
    }
}
3. Create the TestNG Factory Method Class for Load Testing.
import org.openqa.selenium.firefox.FirefoxDriver;
import org.testng.annotations.Factory;

public class LoadTestFactory {

    @Factory
    public Object[] createInstances() {

        Object[] obj = new Object[10];

        for (int iter = 0; iter < 10; iter++) {
            obj[iter] = new LoadTestScenario(new FirefoxDriver());
        }

        return obj;
    }
}
4. Test Execution and Reporting.
In a Maven project, it is very simple to run the tests. Just, select the POM file in the Eclipse project pane. Right-click on it and choose the Run As >> Maven test option. It’ll make all the tests hit the deck.
There is a total of thirty tests that will run. Out of them, ten tests will pass, ten will skip, and ten will fail.
We’ve used the ReportNG library for creating reports. For this, we’ve added a dependency to its library in the maven’s POM file. You might like to check out the POM file to review the reporting functionality.
Read these three ways to generate reports in Selenium, in case you want to enhance the test results further.
Here is the ReportNG execution report attached after the test run.
4.1. Load Test Execution Summary.

4.2. Load Test Execution Detail.

Try This Quiz: Selenium WebDriver TestNG Quiz
Summary – How to Use TestNG Factory Method for Load Testing.
We are hopeful that this post will enable you to use TestNG @Factory annotation for load testing. Also, you would’ve learned how to use ReportNG for reporting in TestNG projects.
It would be great if you let us know your feedback on this post. Also, you can ask us to write on a topic of your choice. We’ll add it to our writing plan.
If you enjoyed the post, then please don’t leave without sharing it with friends and on social media.
Keep Learning,
TechBeamers.


